
Advertisements
How to install Google Analytics in WordPress? This is an important question to address if you want to optimize your WordPress website.
You can track website traffic, user behavior, bounce rate, and the most visited pages by creating a Google Analytics account and embedding the script into your WordPress site.
With the data provided by Google Analytics, you can better optimize your website to drive higher traffic.
This WordPress tutorial covers what Google Analytics is, how to create a Google Analytics account, and how to connect Google Analytics to your WordPress website.
Advertisements
What Is Google Analytics and Is It Free?
Google Analytics is a service from Google that helps you monitor and present traffic data from your website. This allows you to view traffic sources, the most popular pages, user behavior, and many other metrics.
So, is Google Analytics a paid service? You can install Google Analytics on WordPress for free. All you need to do is create an account and connect it to your website.
There are two ways to install Google Analytics on a WordPress-based website: (1) Manually using a script code, and (2) Using a Measurement ID.
Google Analytics can be installed on websites that are (1) live, meaning they have been uploaded to a web server and are accessible via the internet, and (2) in development, such as websites hosted on localhost or a local computer.
So how do you start installing Google Analytics on WordPress? Check out the steps below!
Step 1: How to Create Your Own Google Analytics Account
Before you add Google Analytics to WordPress, the first step is to create a Google Analytics account. If you already have one, feel free to skip to Step 2. Here’s how to create a Google Analytics account:
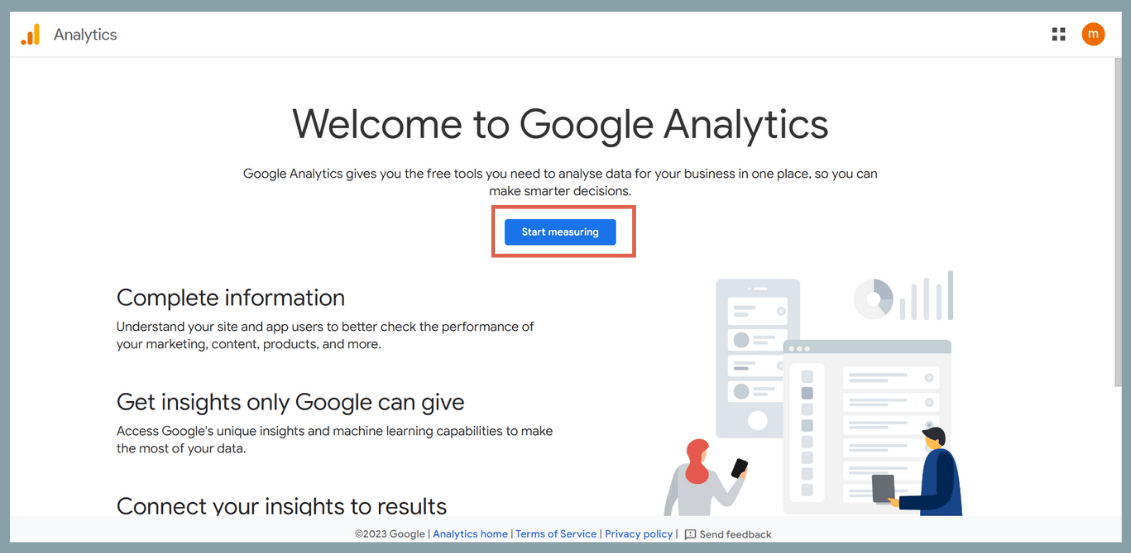
- Visit the Google Analytics website and click Start measuring.

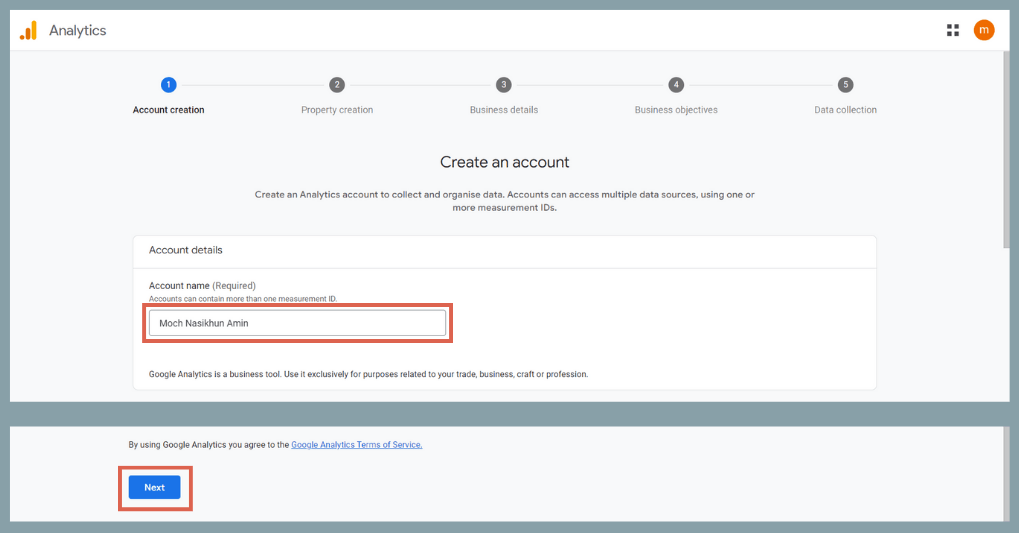
- In the Account name section, enter your preferred account name. Then click Next.

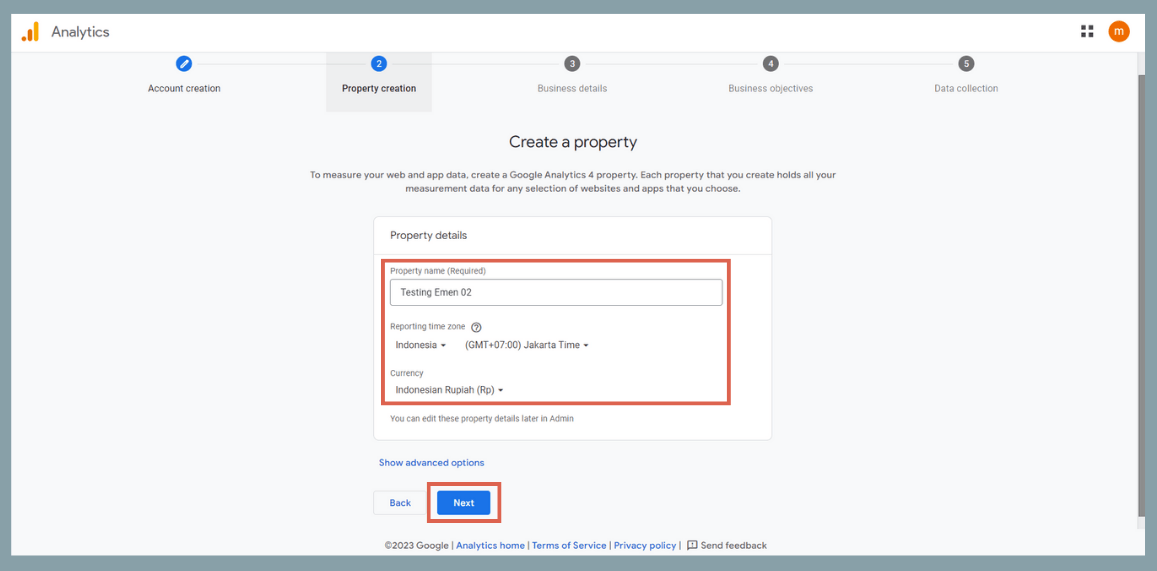
- Enter your Property details (Property name, Reporting time zone, and Currency). When you’re done, click Next.

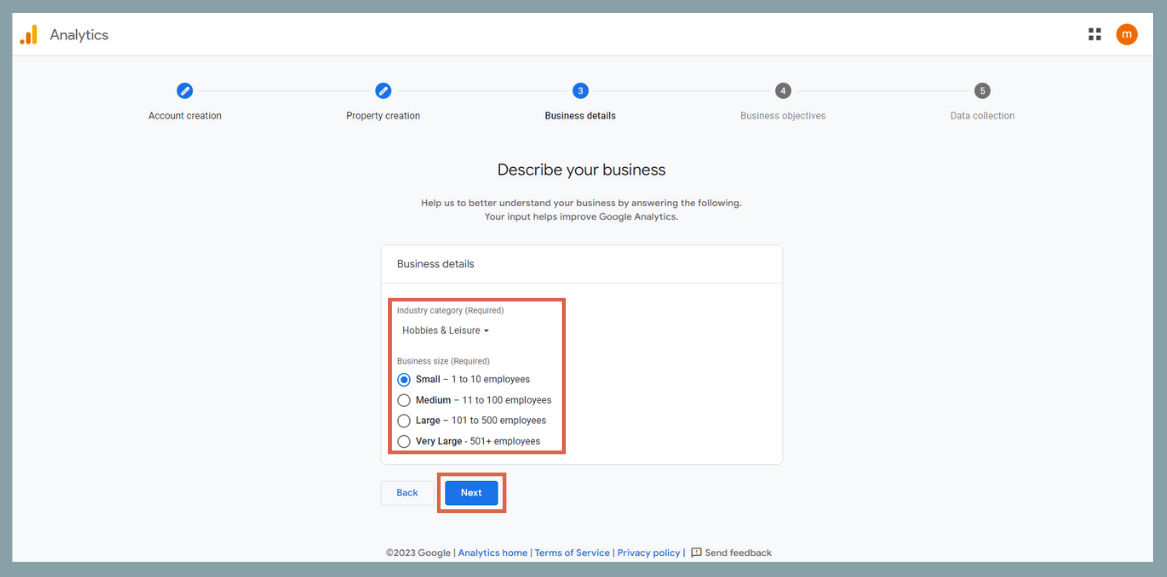
- Fill in the Business details (Industry category and Business size). In this example, we selected Hobbies & Leisure as the category. Then click Next.

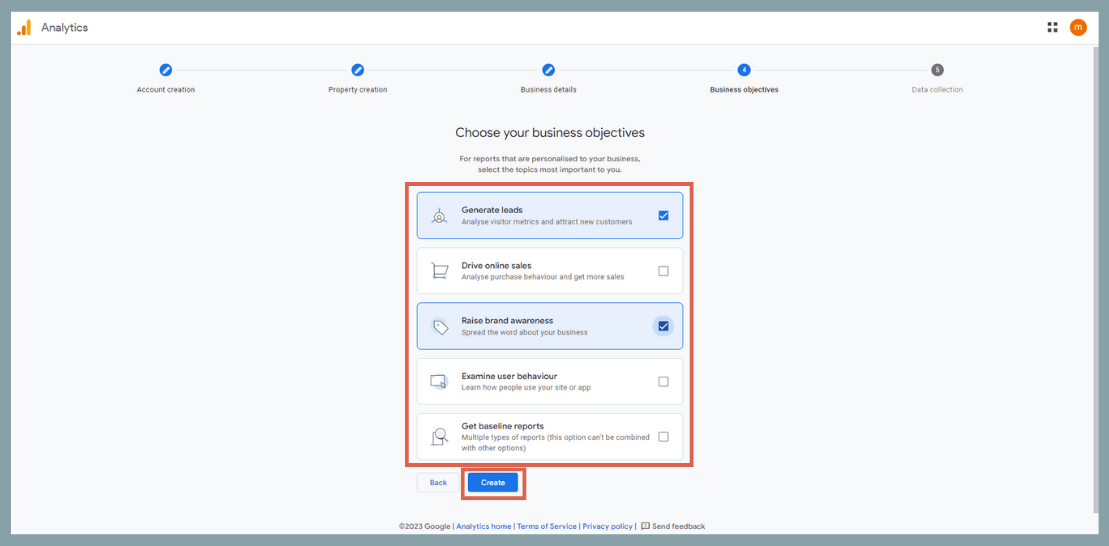
- Choose your Business Objectives or the goals of your website. These will help Google Analytics customize the reports for you. You can select more than one. Once done, click Create.

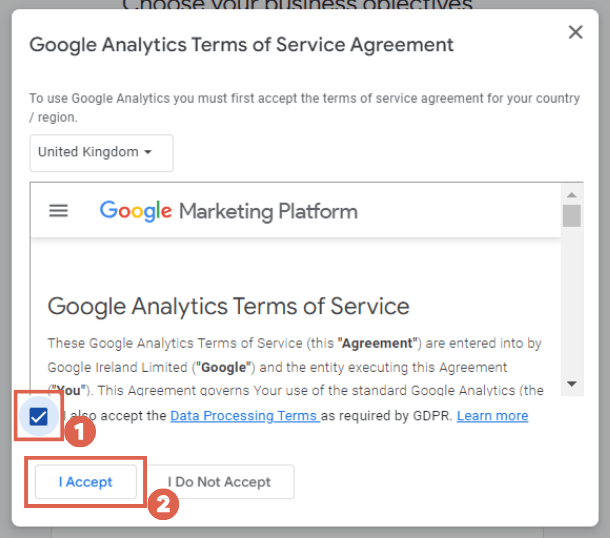
- Check the box to agree to the Terms of Service Agreement, then click I Accept.

- Choose the data collection platform. Select Web.

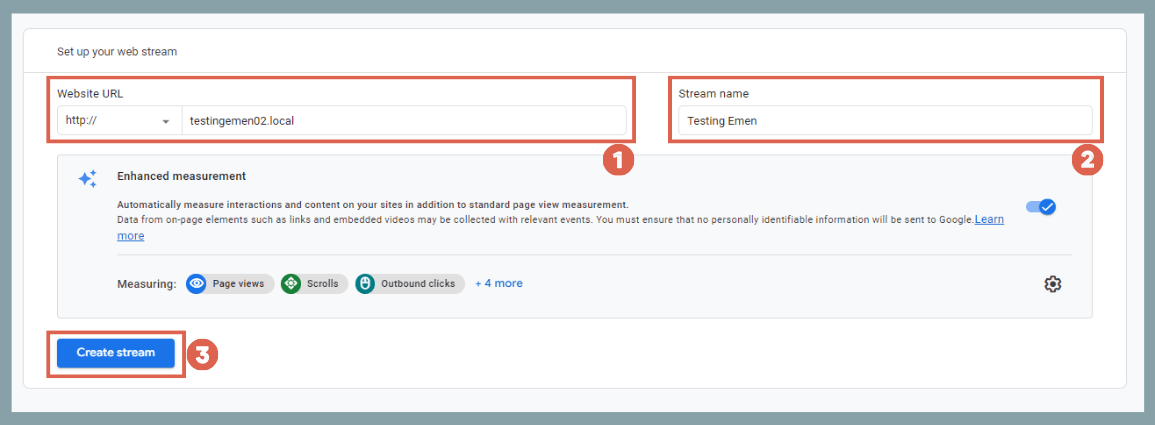
- On the Set up your web stream page, enter your website URL correctly. You can use a website hosted on localhost or one that is already live. Enter the Stream name and click Create stream.

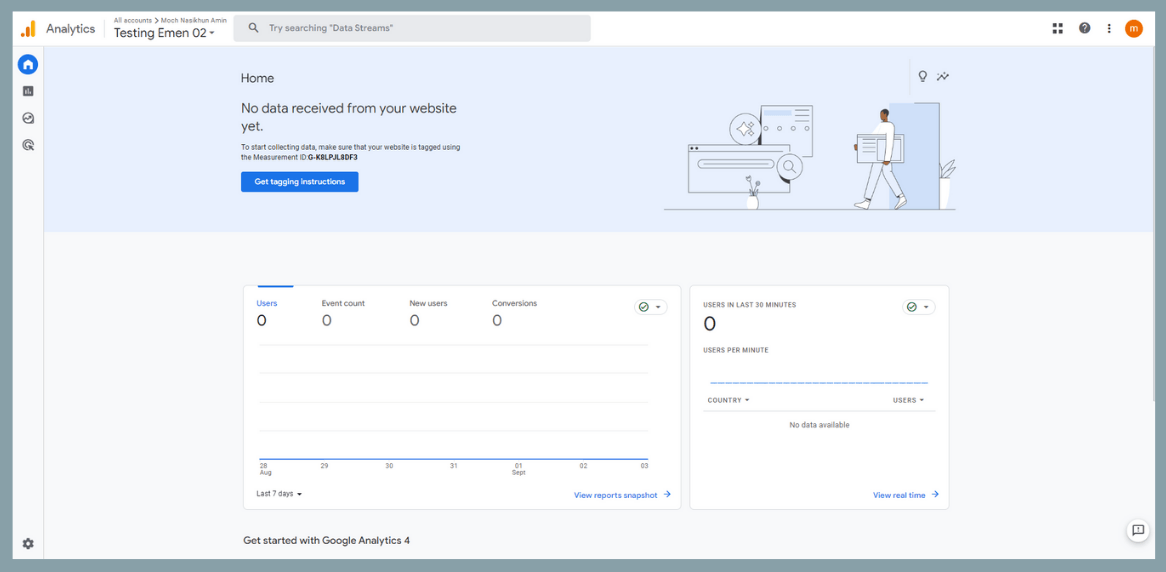
- Done! You’ve successfully created your Google Analytics account.

Now that your account is ready, it’s time to connect Google Analytics to your website.
Advertisements
Step 2: How to Install Google Analytics in WordPress for Beginners
Generally, there are two ways on how to install Google Analytics in WordPress: manually or by using a Measurement ID. The manual method is suitable if your website is still in the development stage.
However, the manual method can also be used for live websites. Meanwhile, installing Google Analytics in WordPress using the Measurement ID can only be done on a live website and requires a plugin.
a. How to Manually Install Google Analytics in WordPress
The manual way to install Google Analytics on a WordPress website is by inserting the script into the header of every page. However, that approach is less efficient.
So here, we’ll use the Insert Headers and Footers plugin. Follow these steps to install Google Analytics in WordPress manually:
- Go to the Google Analytics home page. If the website is not yet connected, it will show a message like this.

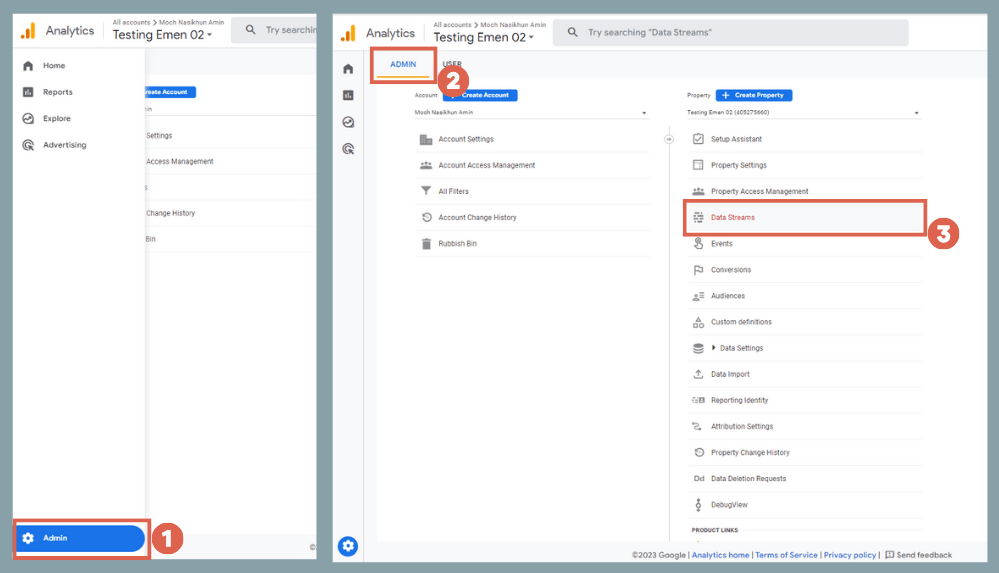
- lick Admin on the bottom-left sidebar > select Admin from the top menu bar > then click on Data Streams.

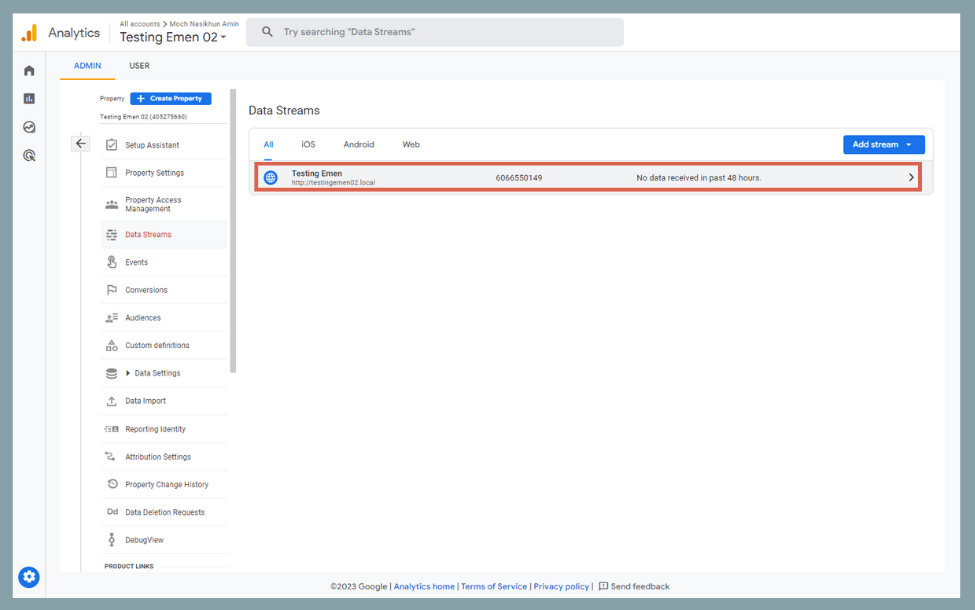
- On the Data Streams page, click on your WordPress website listed there.

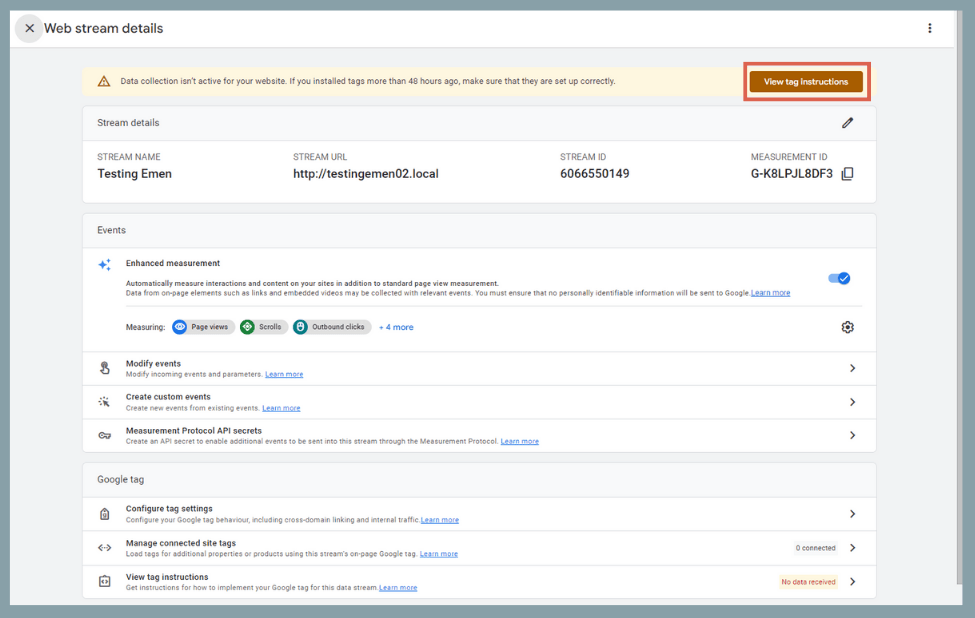
- Click View tag instructions.

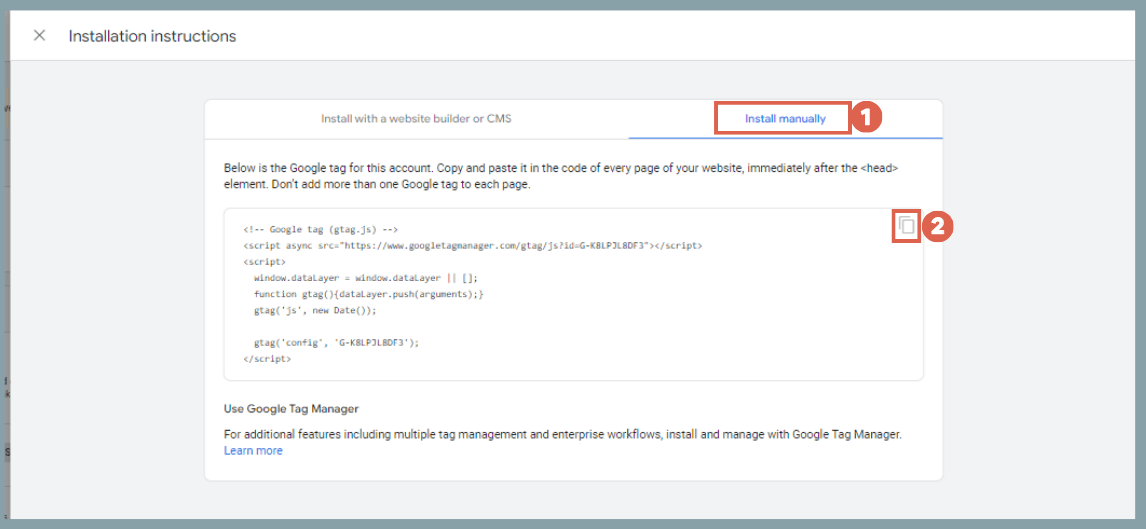
- Select the Install Manually tab > then click the Copy icon to copy the Google Analytics script.

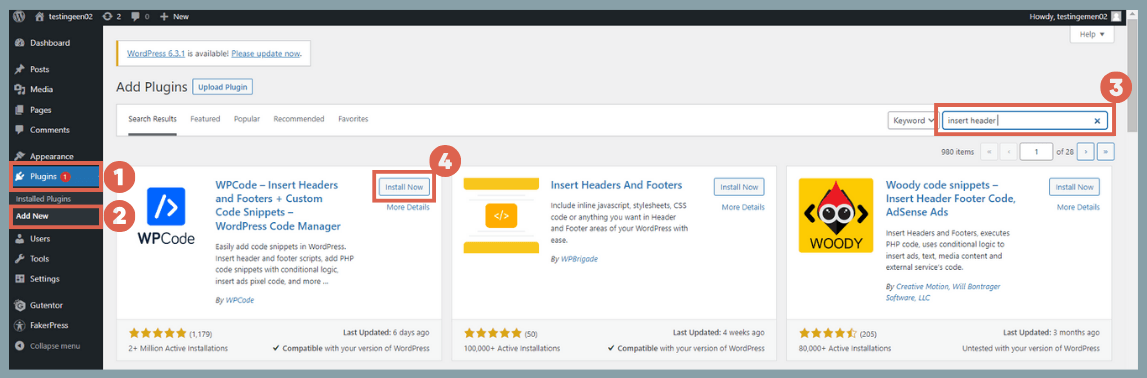
- Now go to your WordPress WP-Admin dashboard. Click Plugins > Add New > type insert header in the plugin search box > click Install Now on the plugin WPCode – Insert Headers and Footers > then click Activate.

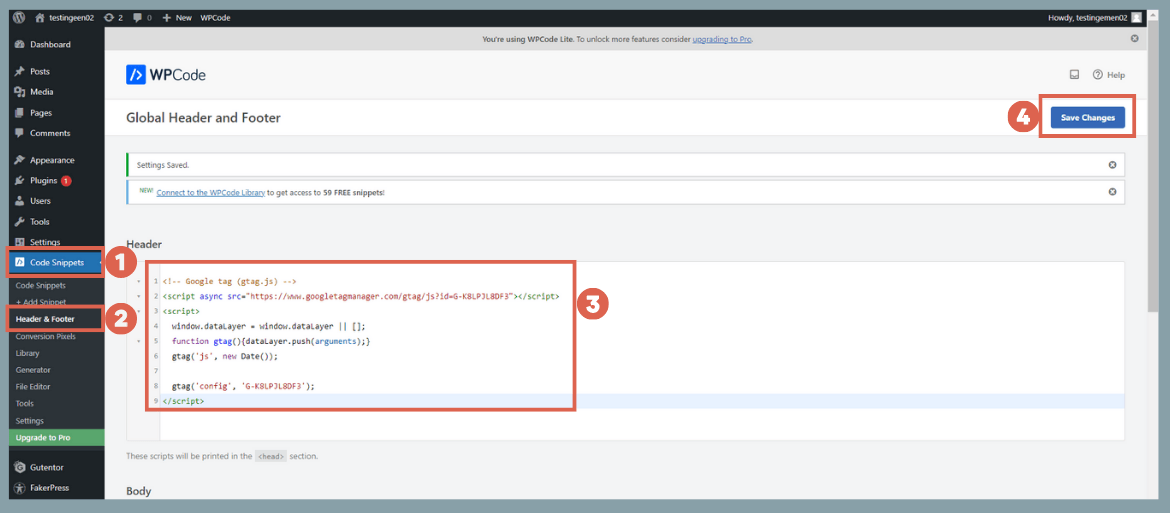
- Once the plugin is installed, click Code Snippets on the right sidebar > select Header & Footer > paste the Google Analytics script into the Header section > click Save Changes.

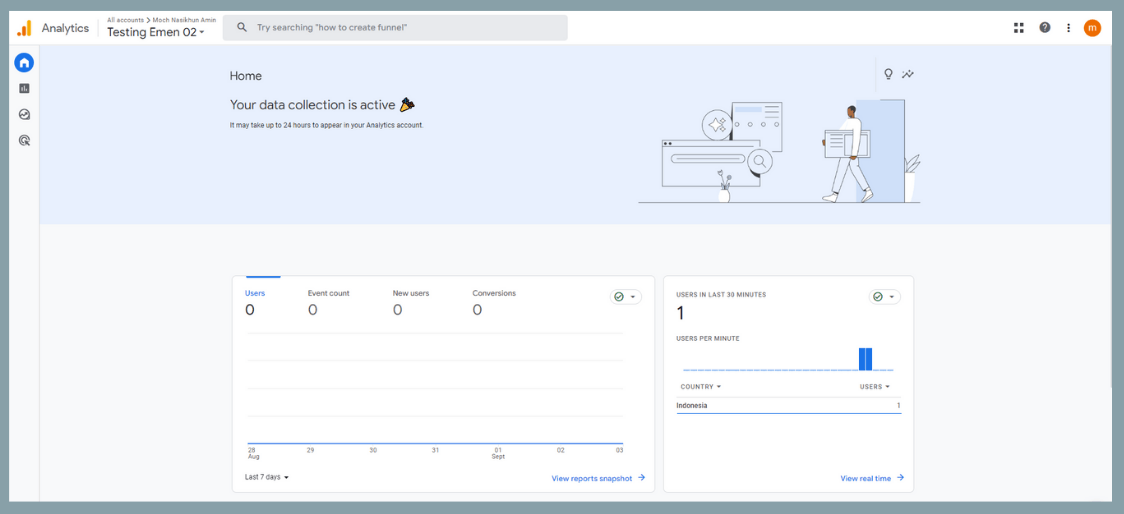
- Finally, return to your Google Analytics dashboard to check whether the website is connected. If you see the message Your data collection is active, that means the connection is successful.

Related Articles
The next method for installing Google Analytics on your website is by using the Measurement ID, which is a unique ID provided by Google Analytics when you register your website URL.
Advertisements
b. How to Install Google Analytics in WordPress Using Measurement ID
Another way to connect WordPress with Google Analytics is by using the Measurement ID, which is provided once you’ve successfully created a Google Analytics account.
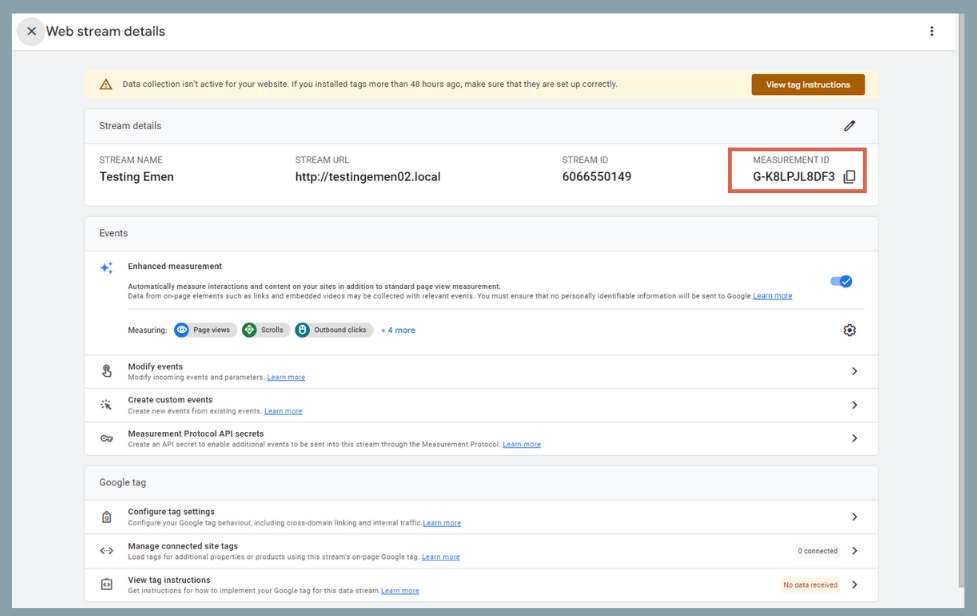
Where can you find the Google Analytics ID? Normally, the Measurement ID appears on the main page right after you’ve finished setting up your account, as shown below.
However, if the Measurement ID doesn’t appear, you can find and install it on WordPress by following these steps:
- Click the Admin menu in the bottom-left sidebar > select the ADMIN menu tab > then click Data Streams.
- Click on the website you’ve registered in Google Analytics.
- Under the Stream details section, you’ll see your Measurement ID, which starts with G-. Copy this ID.

- Next, go to your WordPress WP Admin dashboard and install one of the following plugins:
– Site Kit (by Google)
– MonsterInsights
– HFCM (Header Footer Code Manager) - Paste the Measurement ID into the plugin you’ve installed.
- Done.
You can now go back to your Google Analytics dashboard to confirm whether your website is connected. Traffic data typically starts appearing within 48 hours after installing Google Analytics on WordPress.
Advertisements
Key Terms in Google Analytics
To read and interpret your Google Analytics data accurately, it’s important to understand these common terms used in the platform:
- Users and Sessions: Indicate how many people visit your site and how many times they visit. This gives you a general overview of your site’s traffic.
- Bounce Rate: The percentage of visitors who view only one page before leaving your site. A high bounce rate may suggest irrelevant content or that the page doesn’t meet visitor expectations.
- Average Session Duration: The average time visitors spend on your site during a single visit. This helps you understand how engaging your content is.
- Pages per Session: The average number of pages a visitor views in one session. This gives insight into how deeply visitors interact with your content.
- Most Visited Pages: A list of the pages that are most frequently viewed by your visitors. This shows which content is most popular on your site.
- Traffic Sources: Shows where your visitors are coming from, such as search engines, social media, referral sites, or direct visits.
- Conversions: If you’ve set up goals or e-commerce tracking, this metric shows how your visitors are converting—such as how many make a purchase or sign up for a newsletter.
- User Demographics: Information about your visitors’ age, gender, and interests. This helps segment your audience and tailor your content or ads.
- Devices: Displays what types of devices your visitors use—desktop, mobile, or tablet. This is important for ensuring your site is responsive and optimized for all device types.
- Conversion Rate: The percentage of total visitors who complete a specific action or achieve a goal you’ve set.
- Acquisition: Provides insights into how visitors find your site, whether through organic search, paid search, referrals, social media, or other channels.
- Events: Specific actions taken by users on your site, such as clicking a button or watching a video.
By understanding these terms and metrics, you’ll have a much easier time analyzing the data provided by Google Analytics.
Advertisements
Successfully Installed Google Analytics on WordPress?
That wraps up the tutorial on how to install Google Analytics in WordPress, either by using script code or with a Measurement ID. These methods can be applied to websites that are still under development as well as those already live.
This way, you can start tracking your website’s traffic sources, identify which pages are performing well, understand your user demographics, and see how long users typically stay on your site.
If you have any further questions about WordPress or related topics, feel free to contact Tonjoo or leave a comment below!

For more articles on WordPress, WooCommerce, and web development, check out Tonjoo Studio Blog by Moch. Nasikhun Amin.
Last Updated on June 7, 2025 by Moch. Nasikhun Amin

Advertisements