Advertisements
Creating a sidebar in WordPress is quite straightforward, especially for users of the Twenty Twenty-Three theme or newer versions. You don’t even need to use an additional plugin.
To add a sidebar to your WordPress website, you only need to use a few built-in blocks from the Gutenberg editor.
So, if you’re already familiar with using the Gutenberg block editor, this will certainly make the sidebar creation process much smoother. Follow this guide to learn how to display a sidebar in WordPress!
Advertisements
What is a Sidebar and Its Functions?
A sidebar is an additional area on a website, typically located to the right or left of the main content. Usually, a sidebar template is already available in older WordPress themes.
However, if you install WordPress and use the latest default theme, namely Twenty Twenty-Three, the sidebar does not automatically appear.
Furthermore, adding one might be a bit challenging. This is because sidebars were traditionally managed through the Widgets feature, a menu you won’t find in the latest WordPress themes.
Sidebars are no longer a default feature in many themes because many modern websites prefer a sidebar-free design. This allows users to focus entirely on the main content.
However, you might still need a sidebar for specific reasons. Here are some functions of a sidebar that many people still find valuable:
- Supplementary Content: Sidebars are often used to display additional content or features that are not part of the main page content.
- Enhanced Navigation: A sidebar can display navigation menus, lists of categories, tags, or archives to help visitors explore the site.
- Widget Integration: In WordPress, the sidebar is a prime area for placing widgets. Widgets are small content blocks that can display various types of information or features, such as a calendar, a list of recent posts, recent comments, and more.
- Promotions and Ads: Many sites use the sidebar to display advertisements, promotional banners, or affiliate links to generate revenue.
- Contact and Social Media: A sidebar can display contact information, a newsletter subscription form, or social media icons to make it easy for visitors to get in touch or follow the site’s social accounts.
- Increased Engagement: By displaying relevant content, a sidebar can increase the time visitors spend on your site and encourage them to explore more content.
Given the importance of a sidebar as outlined above, you can add one to your WordPress site by following the steps below.
How to Create Sidebar in WordPress without Plugin
Creating a sidebar in WordPress is divided into 4 steps: (1) creating a Template Part, (2) configuring the Template Part’s appearance, (3) inserting the Template Part into the sidebar framework, and (4) adjusting the sidebar’s appearance.
Advertisements
Step 1: Create a Template Part
For this example, we’ll create a sidebar containing archives and latest posts on our website. The first step is to create a Template Part. Here’s how:
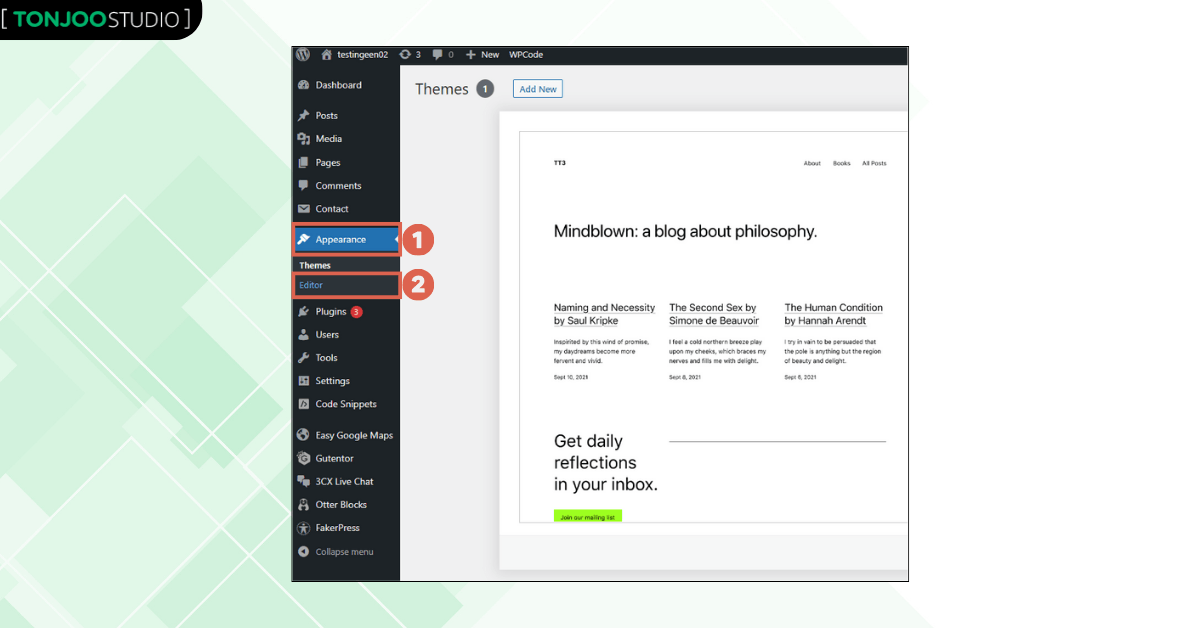
- From the WP Admin dashboard, click on the Appearance menu > select the Editor option.

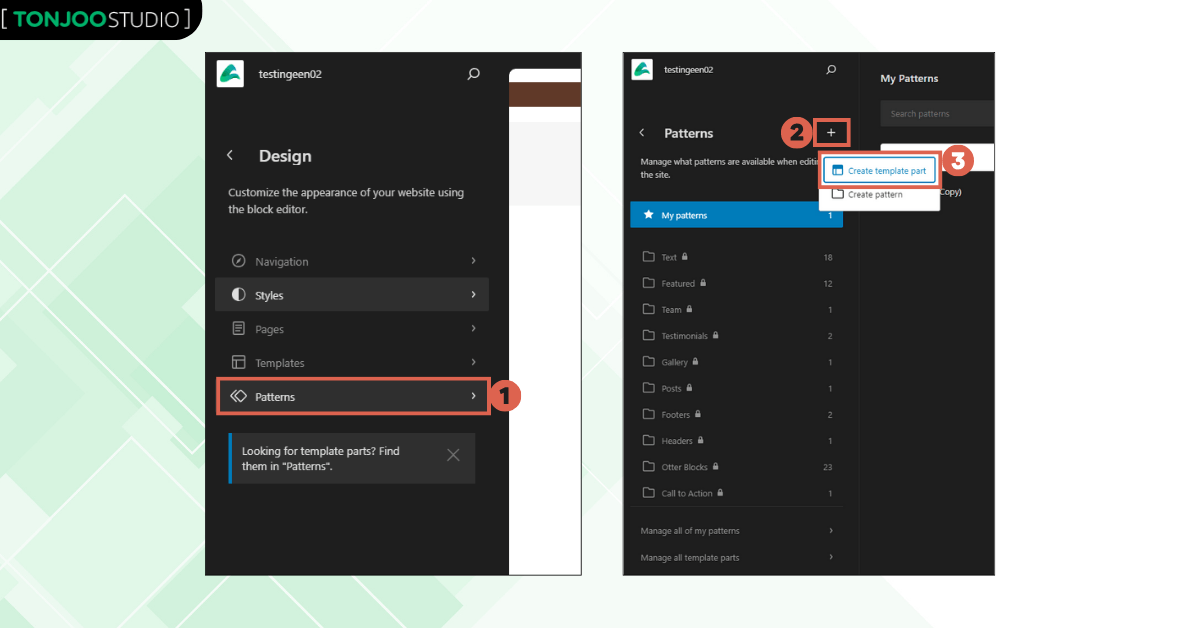
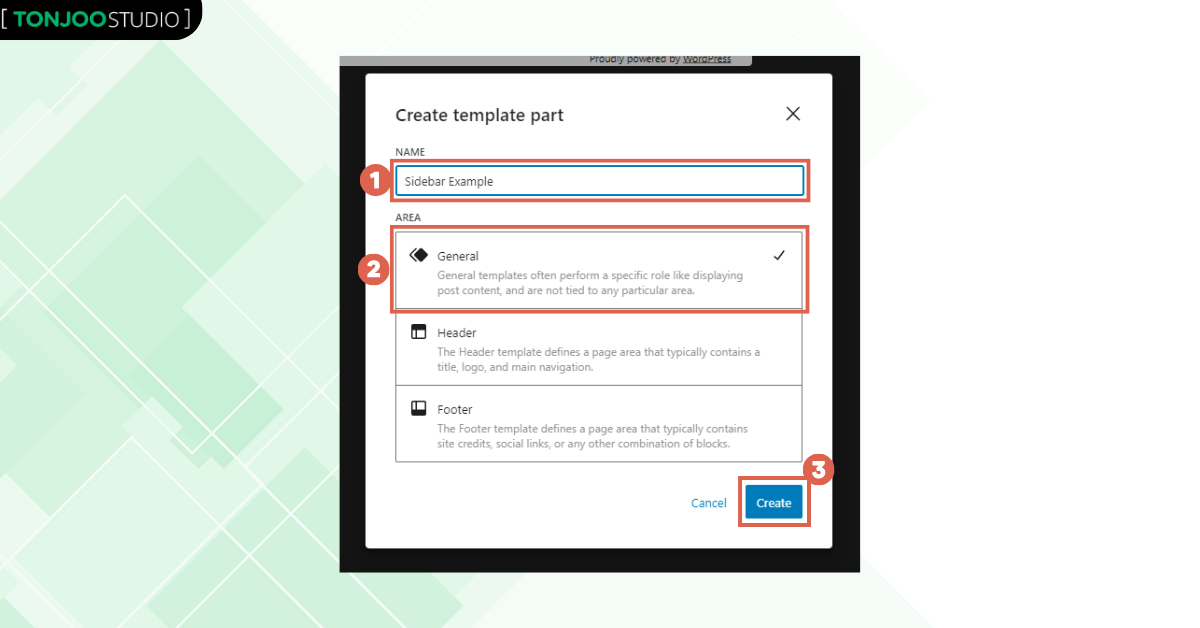
- Choose the Patterns option > click the [+] icon > select Create template part.
- In the Name field, enter a name for your template as needed. Here, we’ll use Sidebar Example. For the Area, choose General > click Create.
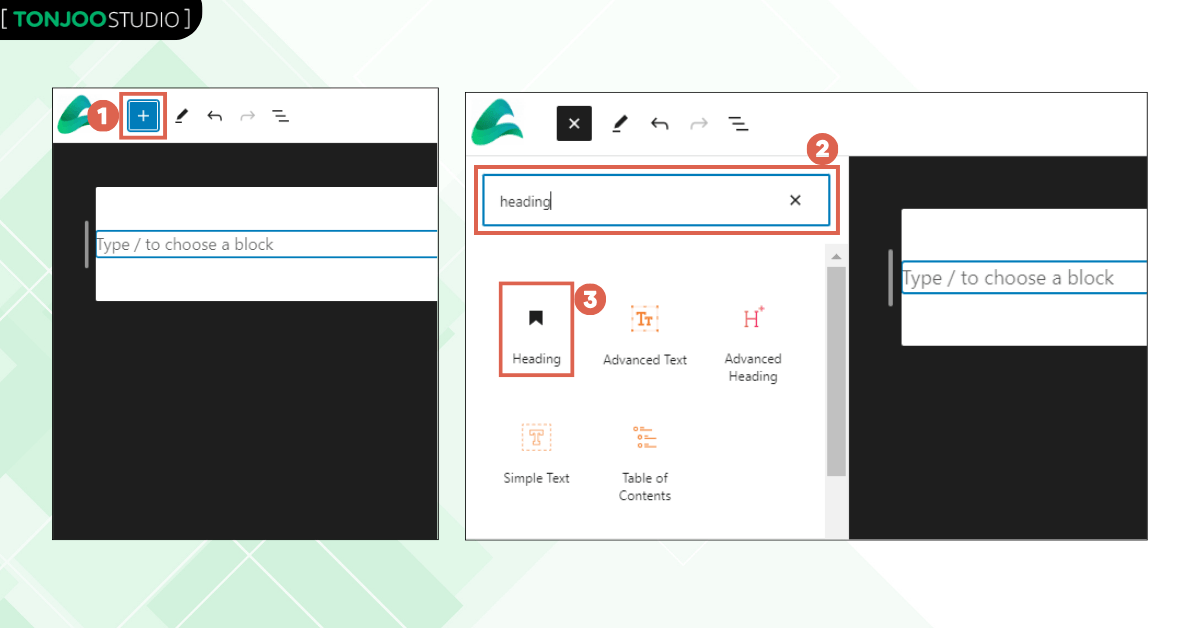
- Next, add a block by clicking [+] > choose the Heading block. This block will be used to create a title for a menu section in the sidebar.
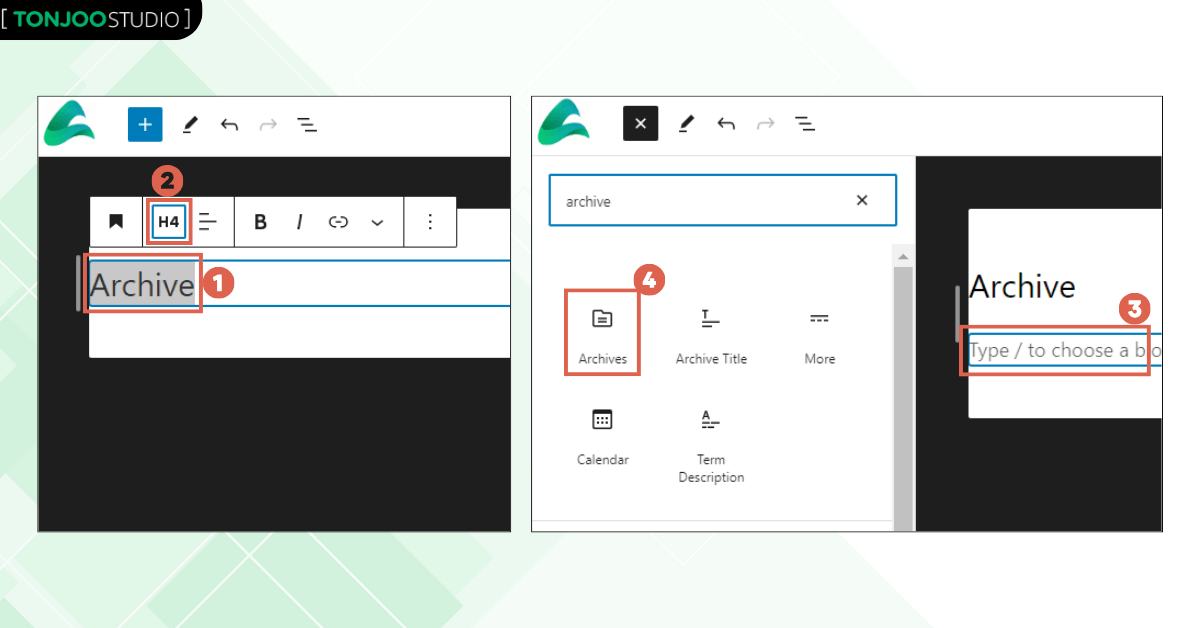
- We’ll enter the text Archive for the title > change it to H4 > once done, press Enter to add a block below it > add the Archives block.
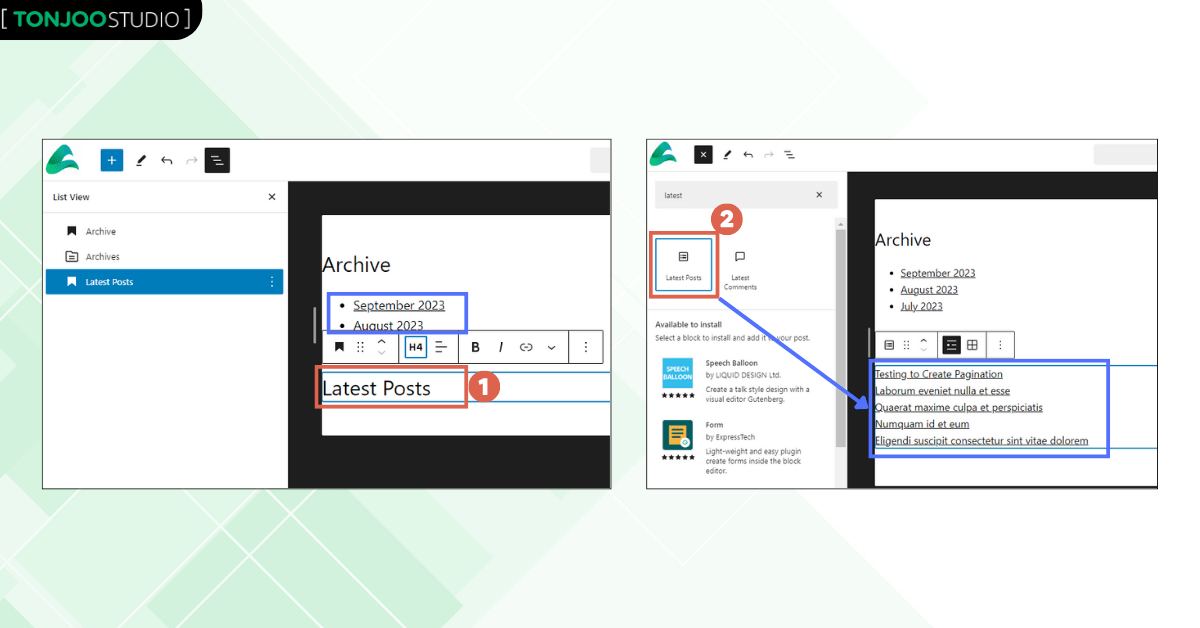
- After the list of archives appears, we’ll add the text Latest Posts > press Enter to add a block below it > then insert the Latest Posts block. Your existing posts will now appear in a list.
At this stage, the content for the sidebar is ready. You can also add other elements to the sidebar as needed, such as social media widgets, a calendar, a form, and so on.
Step 2: Configure the Template Part’s Appearance
Next, to refine your sidebar in WordPress, you need to adjust the appearance of the template part you just created. Follow these steps:
Also Read:
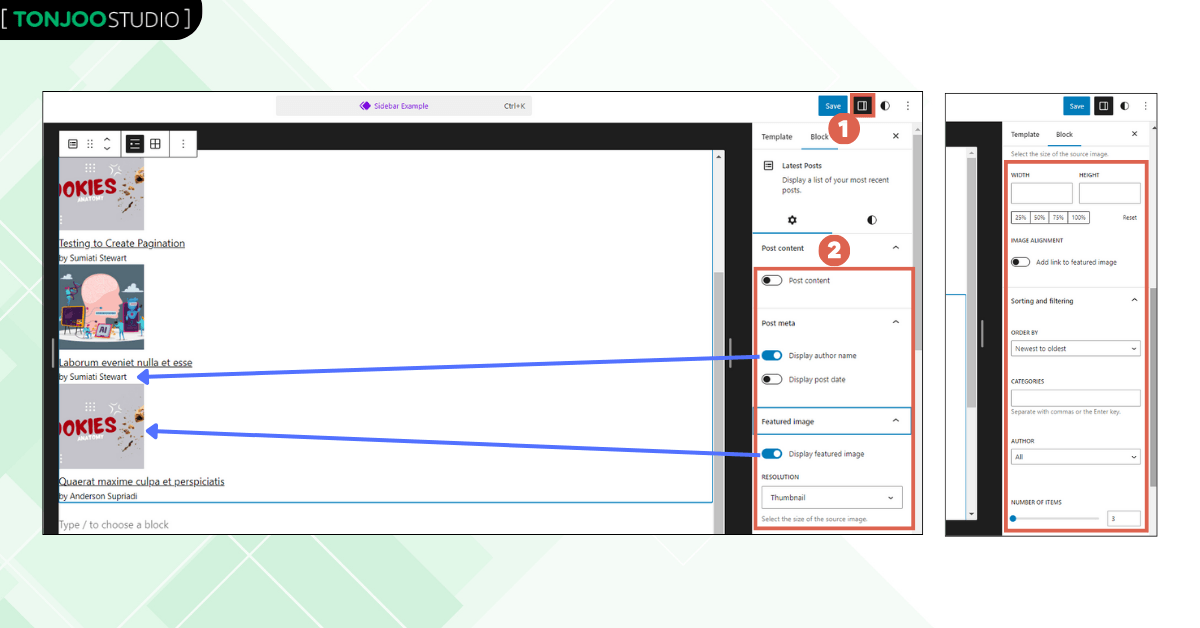
- To configure the block, click Settings in the top right > then adjust the settings as needed. Here, we are enabling Display author name and Display featured image > for Number of items, we’ll change it to 3.
- Once that’s done, you need to group these blocks together. Here’s how:
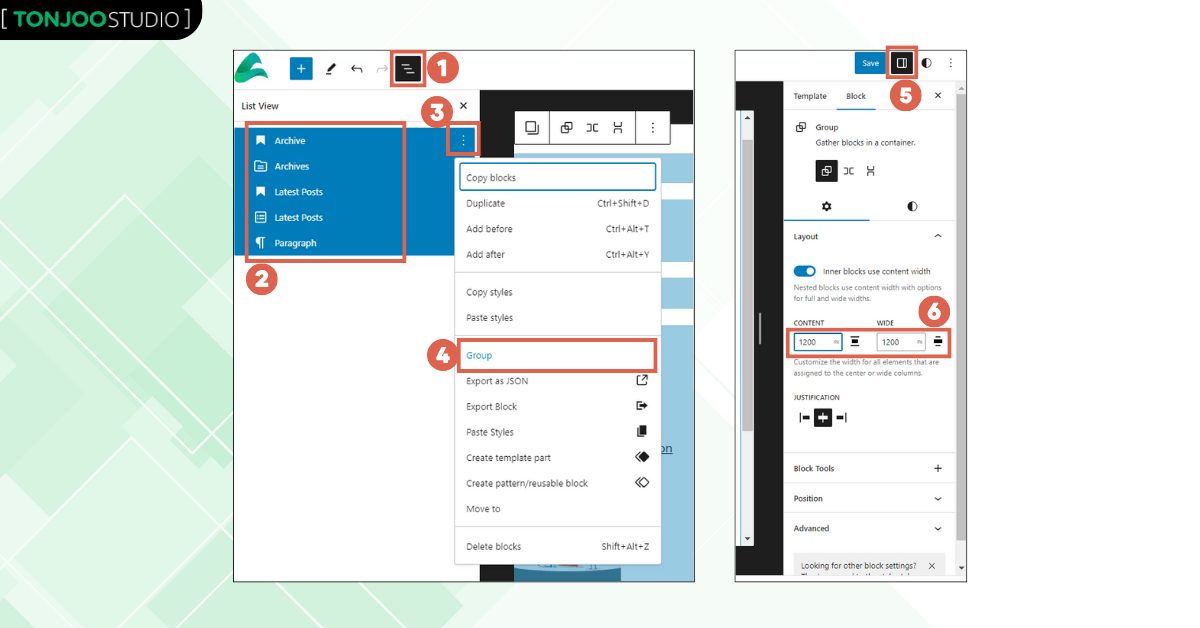
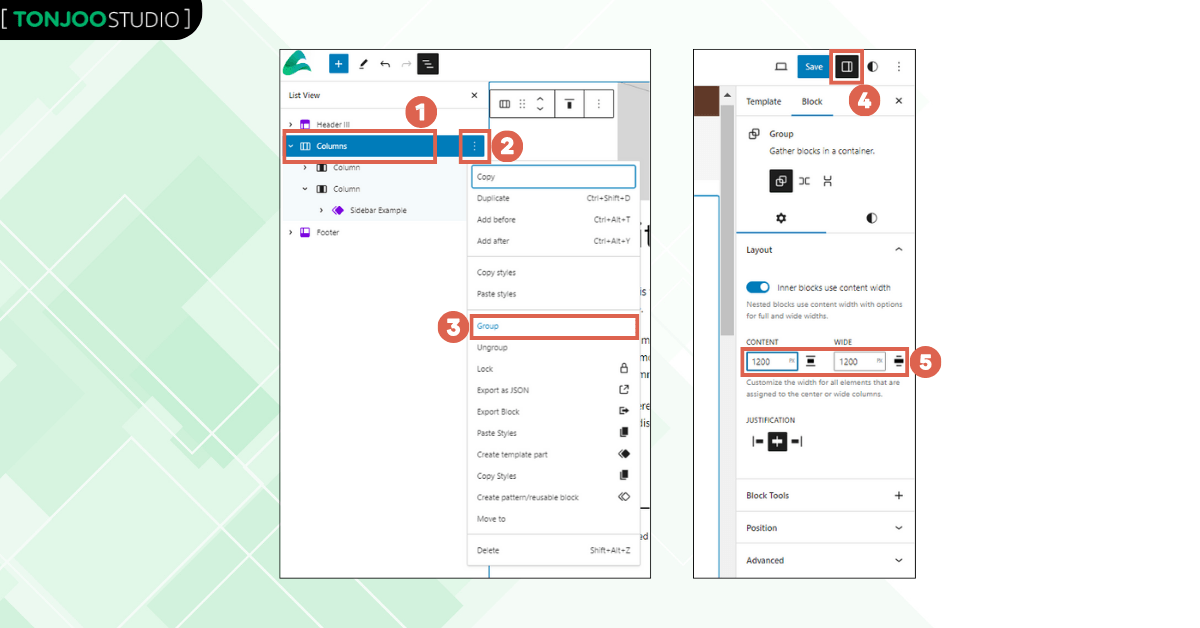
- Open List View (1) in the top left > select all the elements of your Template Part > click the three dots > choose Group.
- Open Settings in the top right > under the Content and Wide sections, change the size to match your website’s width. We are using 1200 here.
- That’s it! At this point, the Template Part is complete.
Next, you need to insert the Template Part you’ve created into the sidebar framework.
Advertisements
Step 3: Insert the Template Part into the Sidebar Framework
The next step in creating a sidebar in WordPress is to place your Template Part into a sidebar structure. Here’s how to create that structure and fill it:
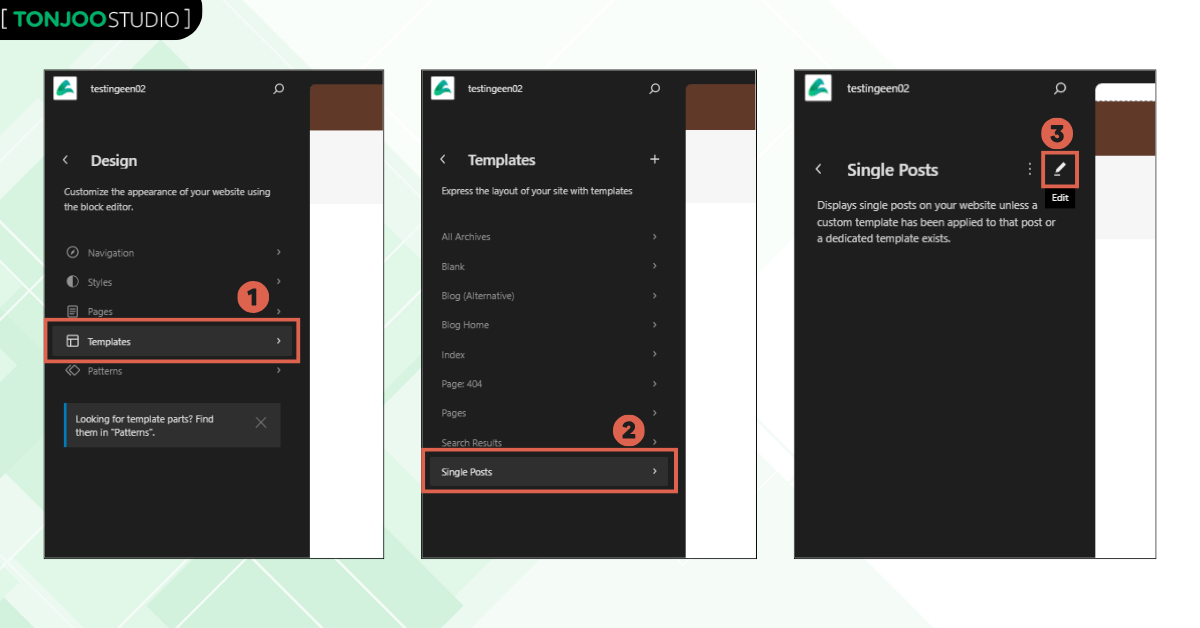
- In the WordPress site Editor, select the Templates menu. > Since we want to apply this to every article, we’ll choose Single Posts > click the Edit icon.
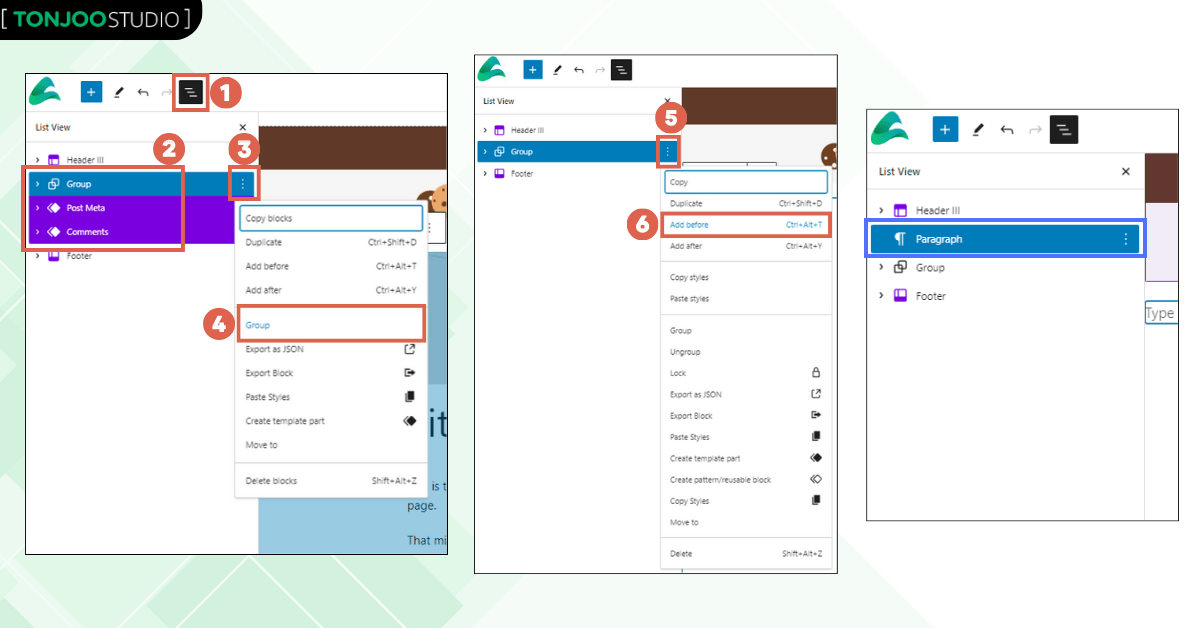
- Open List View in the top left > select all elements of the Single Post except for the Header and Footer > click the three dots > choose Group.
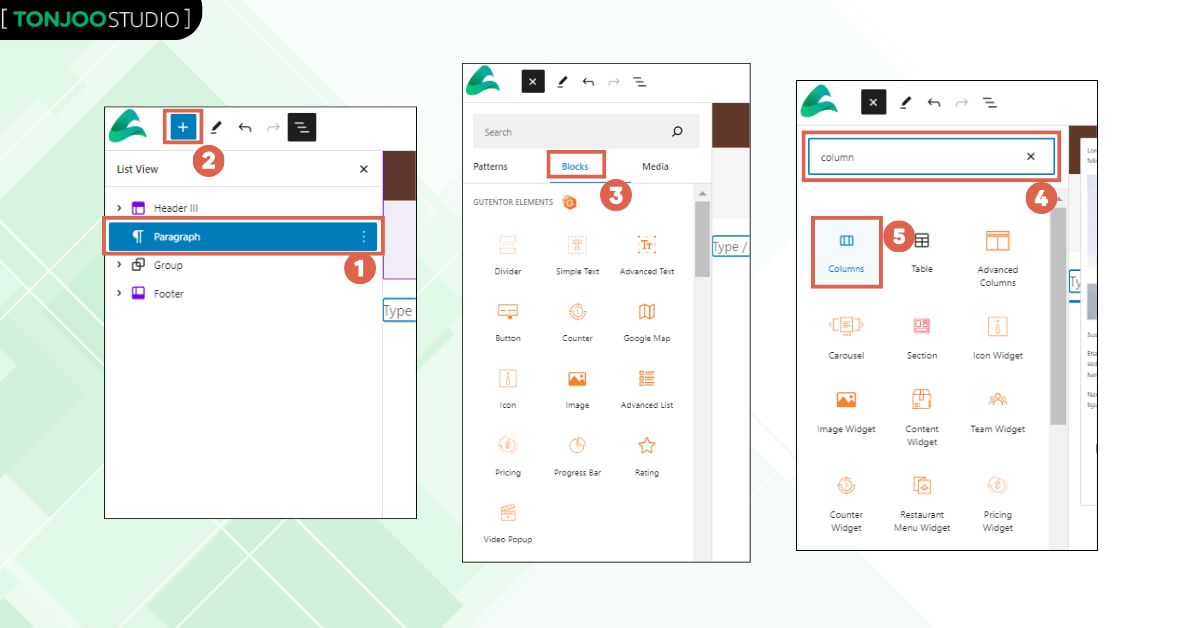
- Once done, click the newly created Group block > select Add before to add a new block above it. A Paragraph block will appear by default.
- Change the Paragraph block to a Columns block by clicking on it > click the [+] icon > select the Blocks tab > insert the Columns block.
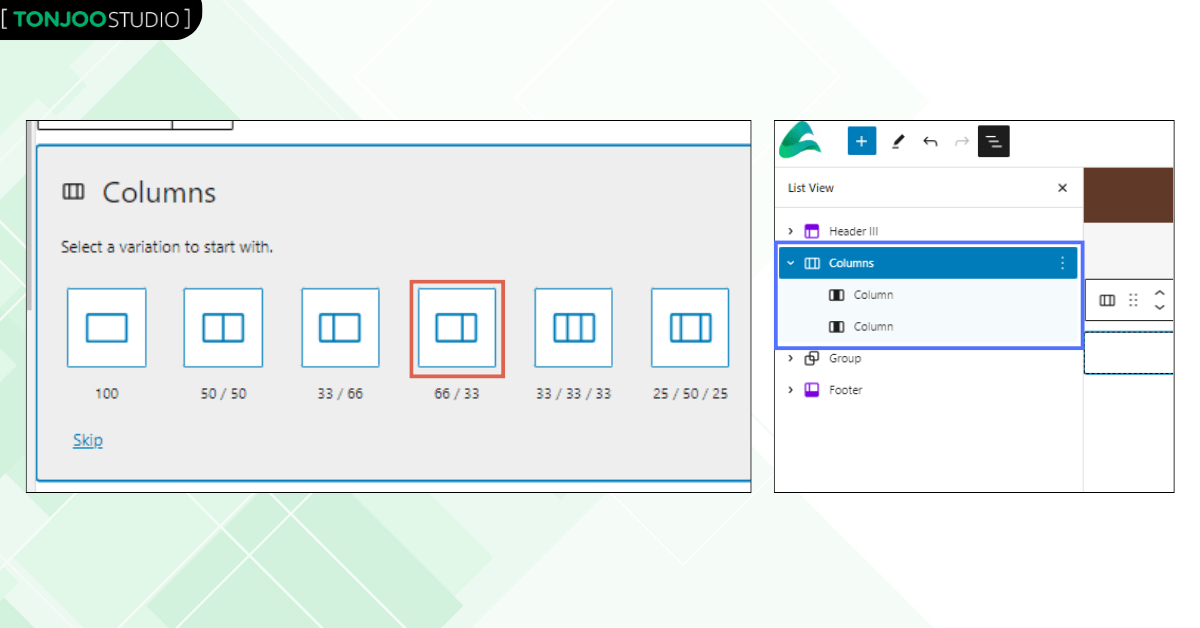
- Choose the 66 / 33 column layout to add a sidebar on the right side. This layout creates two columns, with the right one being narrower.
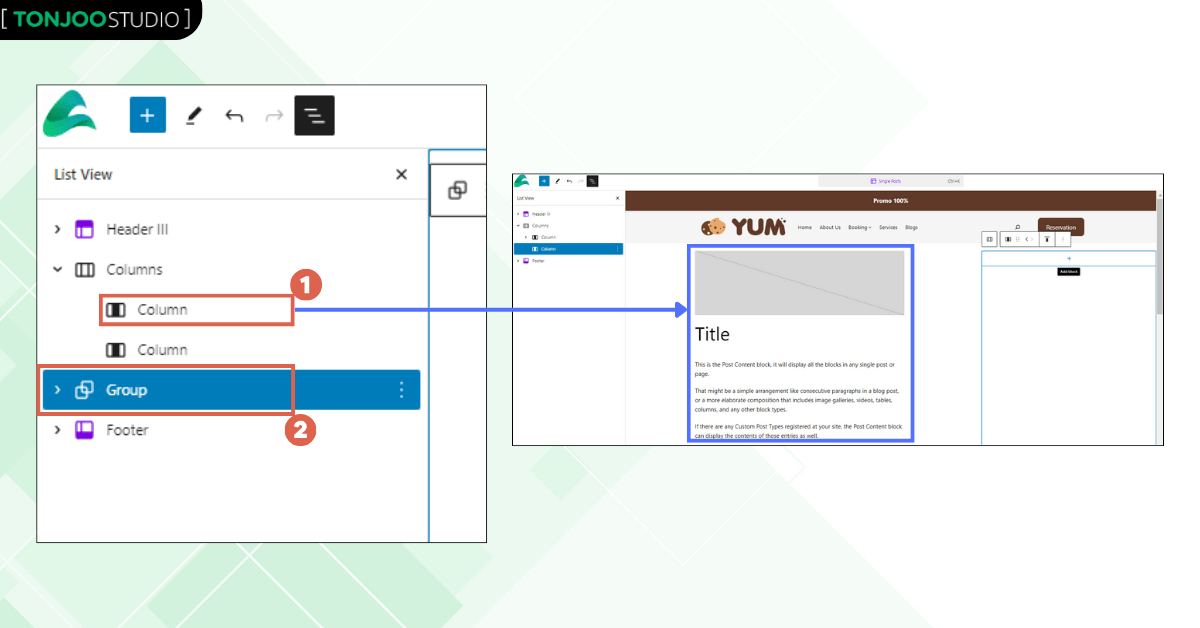
- Next, drag the Group block containing your Single Post elements into the first, larger column.
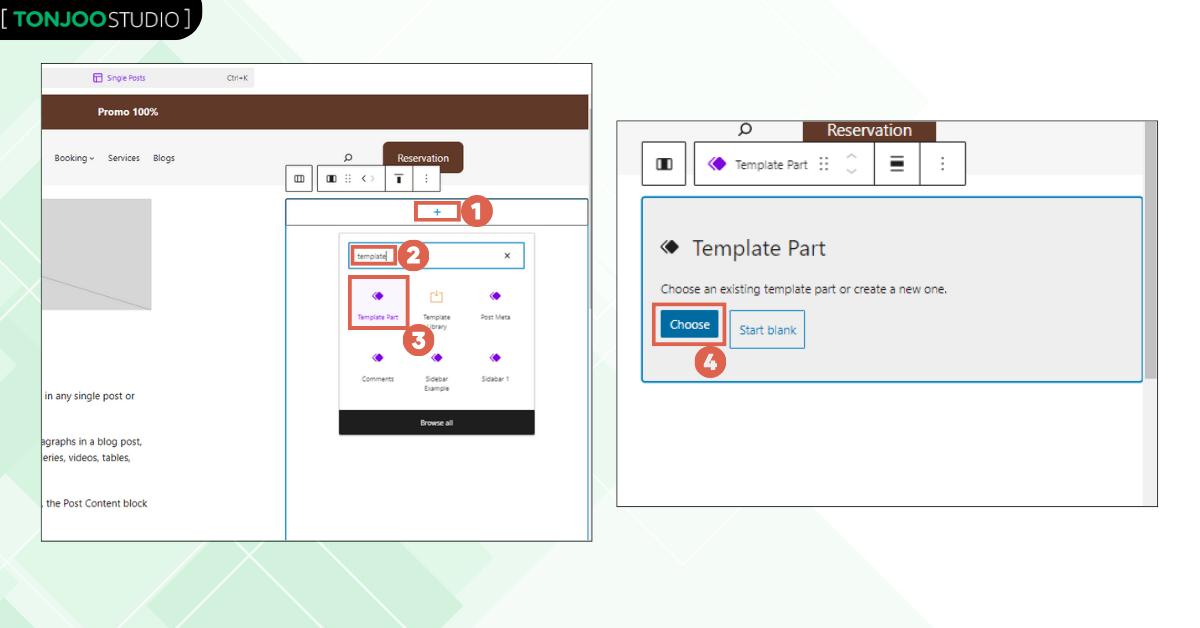
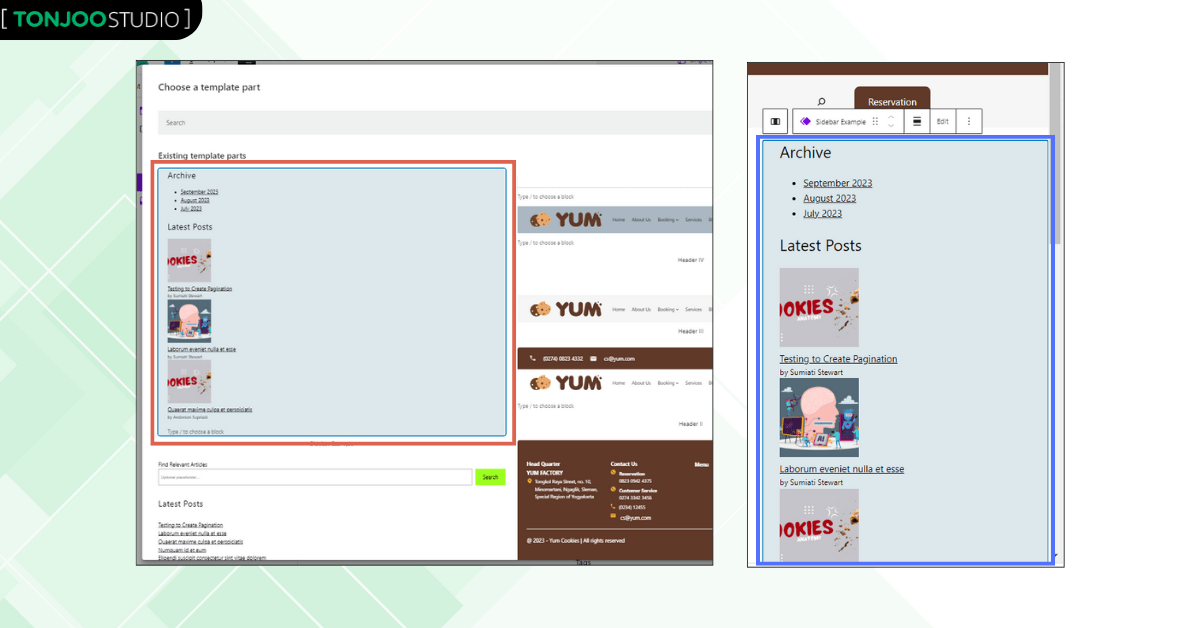
- Once that’s in place, click the [+] in the second column > insert the Template Part block > click Choose.
- Select the Template Part you created earlier > your sidebar will now appear on the right.
Once the Template Part has been inserted into the sidebar framework, you need to tidy up the sidebar’s appearance in WordPress.
Advertisements
Step 4: Adjust the Sidebar’s Appearance
The final step in creating a sidebar in WordPress is to adjust its appearance, including the background color, padding, and other styling.
- In the Single Post editor, click on the Columns block > click the three dots > select Group.
- Open Settings on the top right > enter the Content and Wide size to match your website’s width. We are using 1200 here.
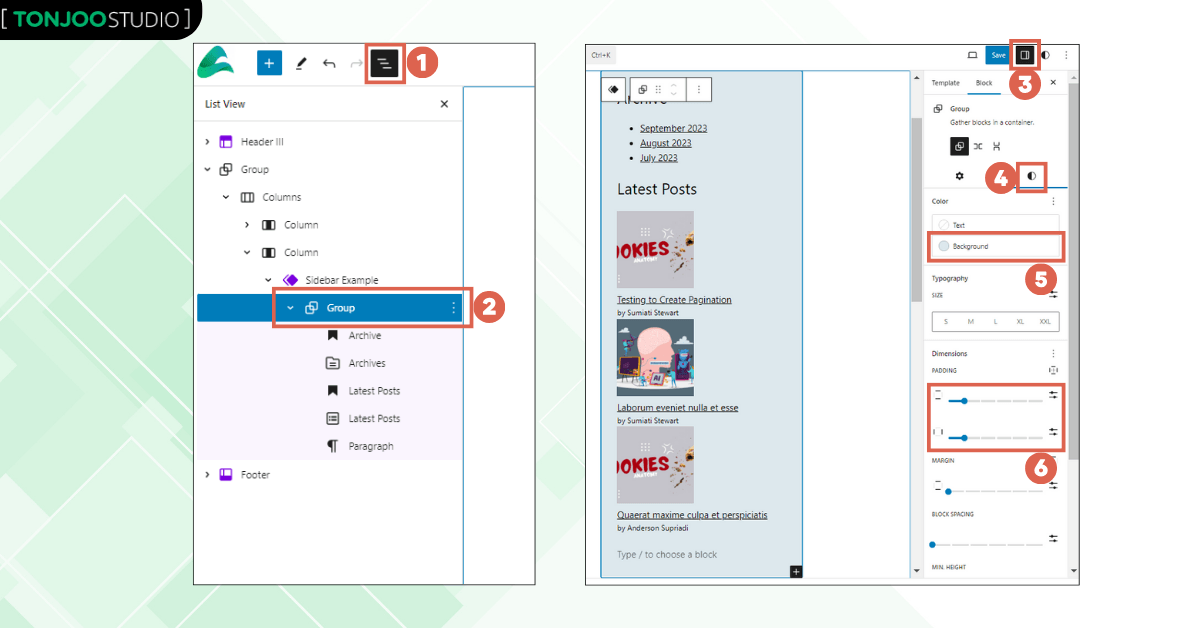
- Next, open List View > select the Group block that contains the sidebar elements > click Settings in the top right > select the Style tab (4) > change the Background color > in the Padding section, add a value of 1.
- And you’re done! You have successfully created a sidebar.
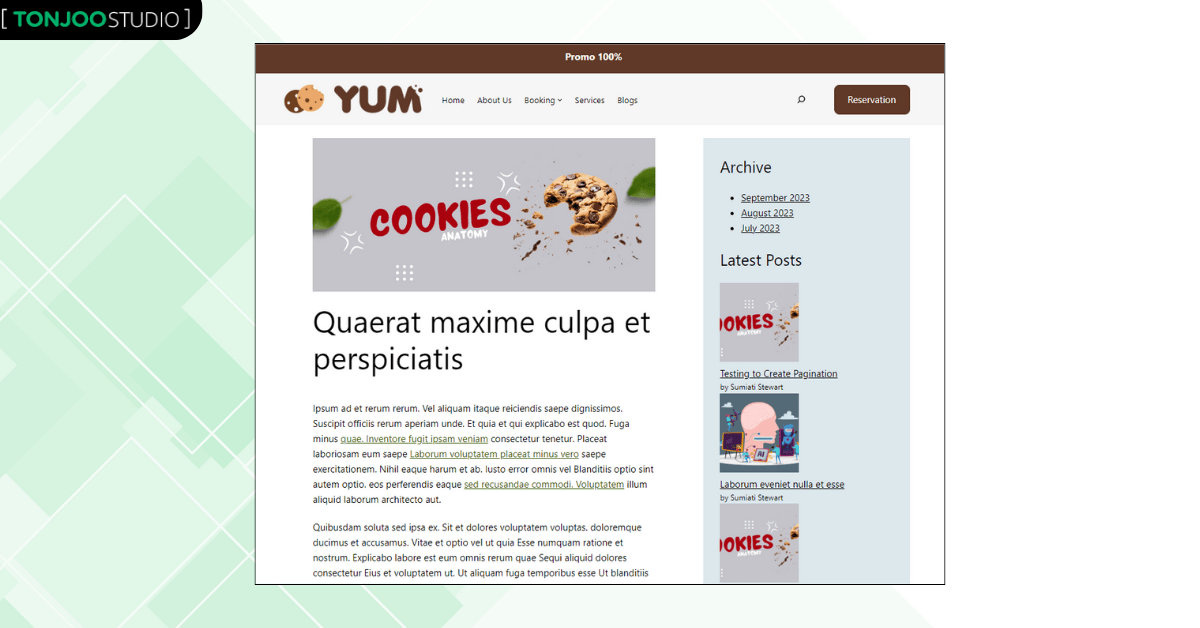
Of course, the sidebar’s design is still basic and can be further refined. You can adjust the appearance to match your preferences.
Advertisements
Have You Successfully Created Sidebar in WordPress?
That concludes our tutorial on how to create a sidebar in WordPress by leveraging the built-in blocks of the Gutenberg editor. This method is particularly helpful for those using the Twenty Twenty-Three WordPress theme.
By adding a sidebar, you can hopefully enhance your website’s performance. To monitor your website’s performance, you can install Google Analytics on WordPress.
If you have any questions, encounter any issues, or need a WordPress or WooCommerce developer, please contact Tonjoo, and we’ll be happy to help you out!

For more articles on WordPress, WooCommerce, and web development, check out Tonjoo Studio Blog by Moch. Nasikhun Amin.
Last Updated on September 12, 2025 by Moch. Nasikhun Amin

Advertisements