
Advertisements
Prevent spam from WordPress – Would you need to disable trackbacks and pings in your old CMS WordPress articles? Trackbacks and pingbacks make it possible for sites to inform each other that they’ve connected to an article.
But today it’s principally used by spammers to send trackbacks from junk sites. In the following guide, we’ll explain to you how you can disable trackbacks and pings on present WordPress posts.
In the first days of blogging, both trackbacks and pingbacks were released as a means for sites to inform each other about hyperlinks. Let us assume you write a guide and include a hyperlink to an article on your buddy blog.
This pingback will subsequently look within their site’s comment moderation queue using a URL to your site. But now this feature is largely used by spammers to send tens of thousands of imitation trackbacks and pings.
Even when you’re using Akismet, a few of those trackbacks may still enter your moderation queue. Then, how to prevent spam from WordPress?
Advertisements
How to Prevent Spam from WordPress Blog
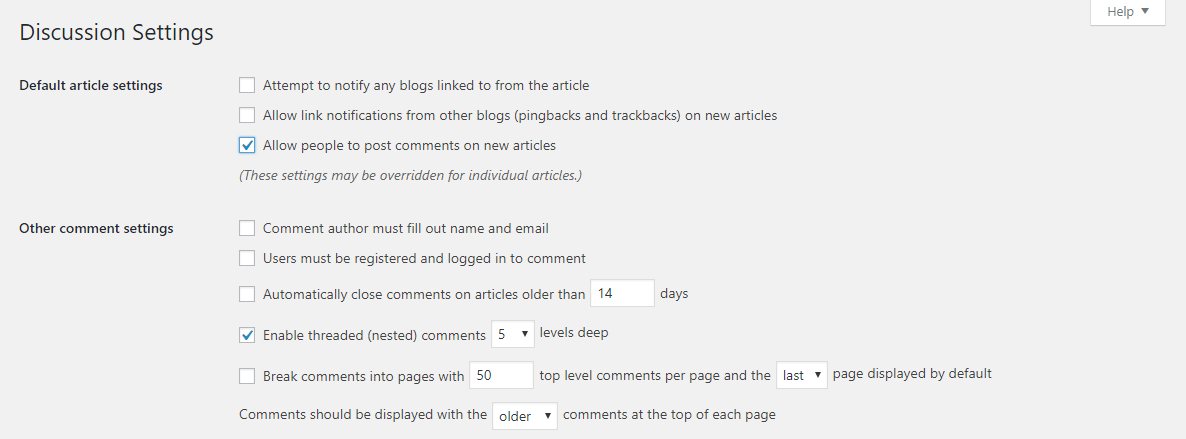
WordPress allows you to turn this feature off. You can prevent spam from WordPress blog by going to Settings > Discussion page and then uncheck the box next to ‘Allow link notifications from other blogs (pingbacks and trackbacks) on new articles’ alternative.
But, it merely turns off them on any new posts that you print. All of your old articles will still have trackbacks and pingbacks permitted. WordPress will also add trackbacks to all those articles whenever you connect them on your own site. See our guide on the way best to disable self pingbacks from WordPress.
Let us take a peek at how to easily disable trackbacks and pings on present WordPress posts.
First you want to see Posts > All Posts webpage and then click on the Screen Options button in the upper right corner of this display.
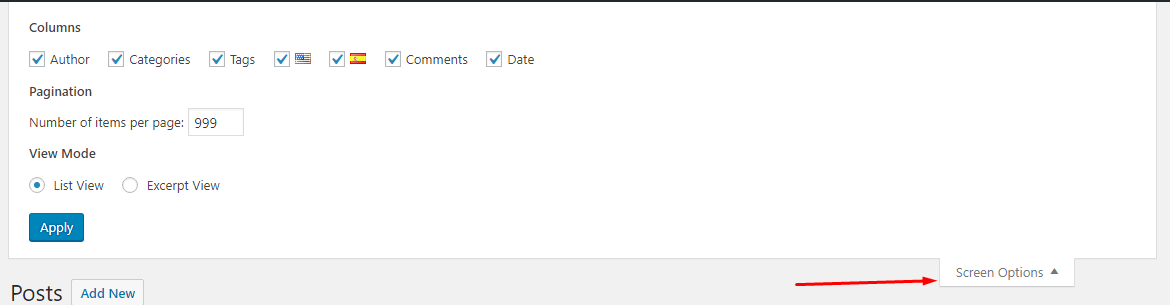
Now enter 999 alongside ‘Number of items per page’ option and then click on apply button.
This can reload the article’s list, and it’ll now reveal up to 999 articles on precisely the exact same page.
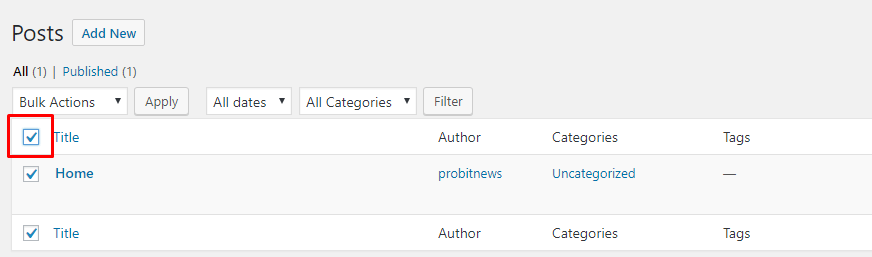
Next, you want to decide on all articles by checking the box beside title tag.
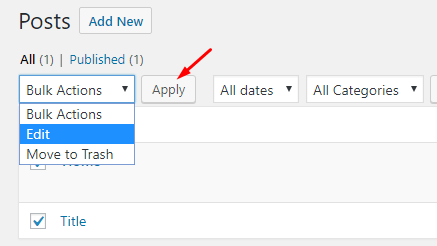
You then want to choose ‘Edit’ from Bulk Actions drop down and then click on the ‘Apply’ button.
WordPress will now show you a majority edit box together with all articles on the webpage selected. In the majority edit box, then you want to start looking for the pings choice and then change it to ‘Do not allow’.
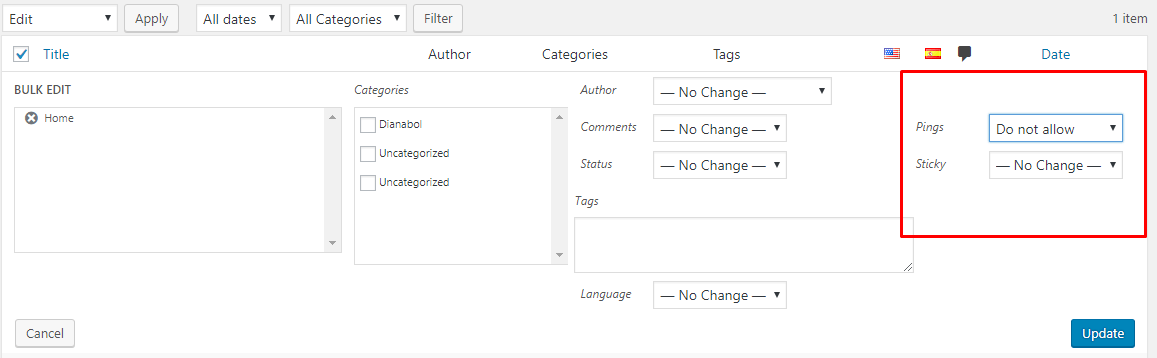
Next, you simply have to click on the update button to store your changes.
WordPress will now upgrade and turn off pings on all chosen posts. If you have over 999 articles on your WordPress website, and then you want to visit another page and repeat the procedure.
Successfully Prevent Spam from WordPress Blog?
If you have managed to prevent spam from WordPress blog, it means that the tutorial works. Managing a website is indeed a lot of work.
However, if you want to focus on your business and not be burdened with website development, you can collaborate with the Tonjoo’s Team, specialists in website development with over 10 years of experience.
We have worked with governments, corporations, and startups. Some examples of our work include Hello Health Group, Unilever, and Futureskills. Contact us to collaborate!

Last Updated on July 18, 2024 by Kevin Alan

Advertisements