
Advertisements
Creating discount coupons in WooCommerce is an effective strategy to attract more customers to your online store. To ensure your coupons work as intended, there are a few key steps you need to follow.
WooCommerce itself is a free WordPress plugin that allows you to build a fully functional e-commerce website. It comes packed with features to support your online store, including a built-in coupon/voucher system.
So, how do you create coupons in WooCommerce without needing any extra plugins? And how do you set limits on their use? Here’s a complete tutorial to guide you through the process!
Advertisements
Prerequisites for Creating WooCommerce Discount Coupons
Before you can create discount coupons for your online store, you must have the free WooCommerce plugin installed. If you haven’t done so, please refer to our tutorial on how to install the WooCommerce plugin.
Besides being free, WooCommerce is also user-friendly, even for those without any coding or programming knowledge. This makes it accessible for everyone.
Currently, WooCommerce powers over 5 million online stores. With such a large user community, you can easily find support forums if you run into any issues.
If you already have the WooCommerce plugin installed on your WordPress site, you can jump straight into the tutorial below.
How to Create Discount Coupons in WooCommerce
We’ve broken down the process into four main steps: 1.) Getting Started, 2.) Configuring Usage Restrictions, 3.) Setting Usage Limits, and 4.) Publishing the Coupon.

Advertisements
Step 1: Start Creating Your Coupon
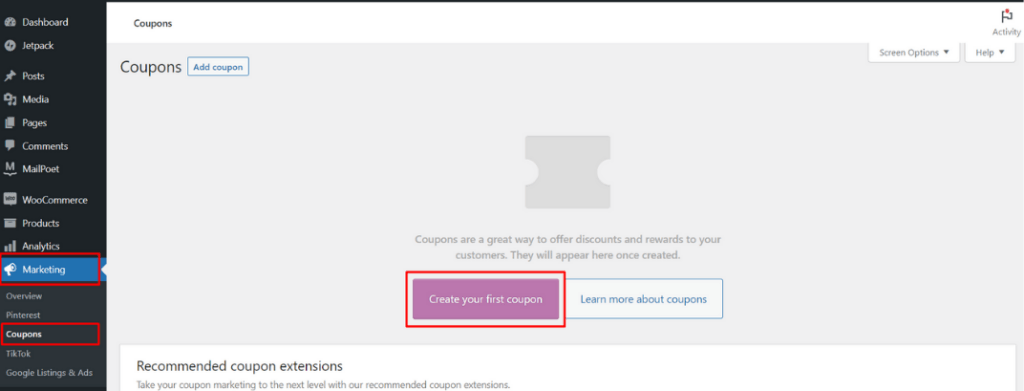
From your WordPress admin dashboard, navigate to the Marketing menu on the left sidebar, select Coupons, and then click Create your first coupon. You can also begin by clicking the Add coupon button at the top of the page.
This will open the coupon creation page. Click Generate coupon code to create a unique code that you can share with your customers.
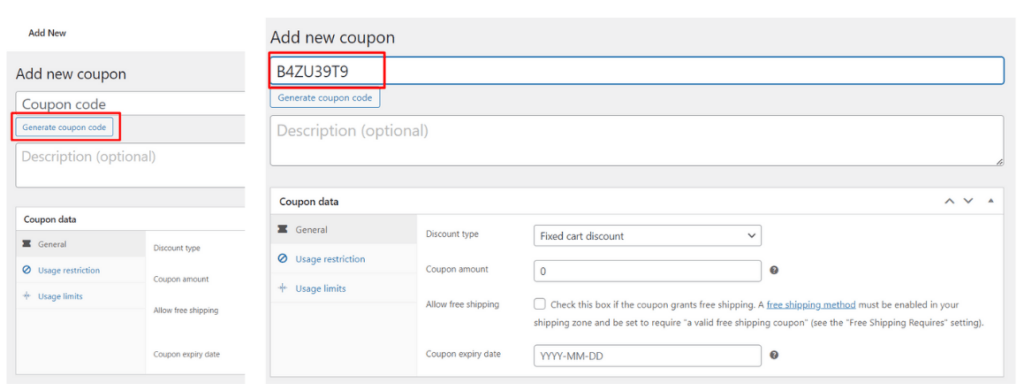
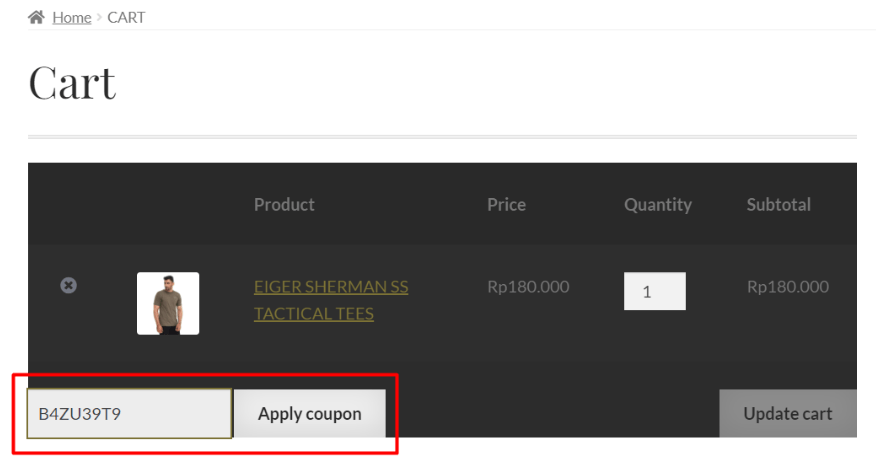
After clicking the button, a random code will appear in the Coupon code field. In the example above, our generated code is B4ZU39T9.
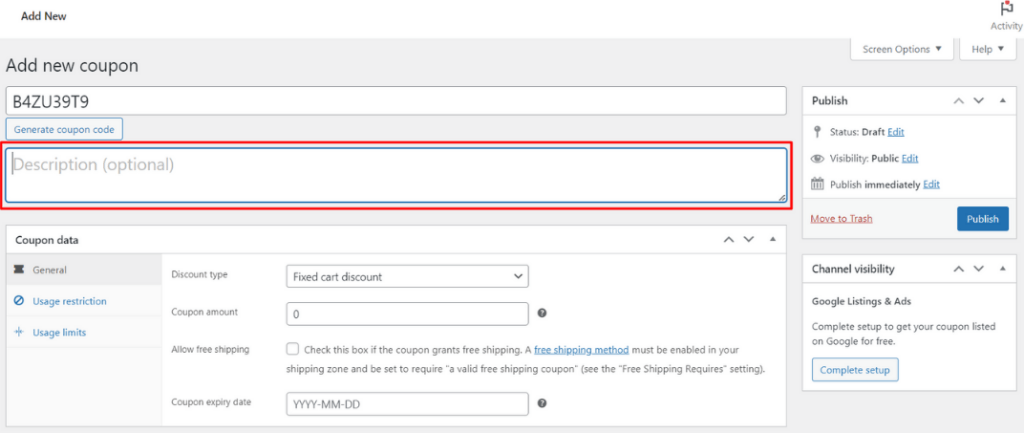
Save or write down this code, as you will provide it to your customers. Next, you can add an optional description for the coupon.
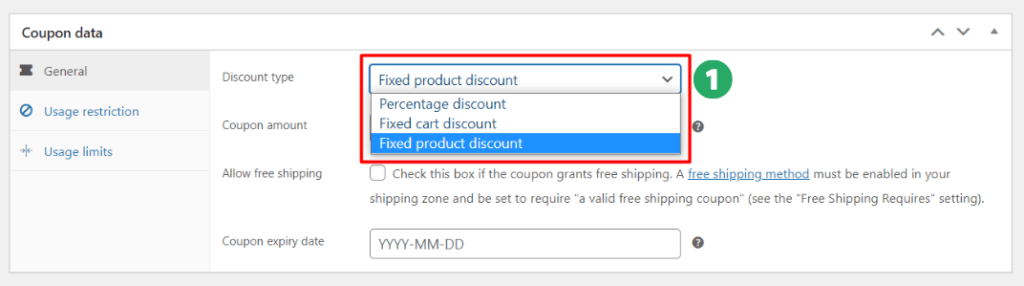
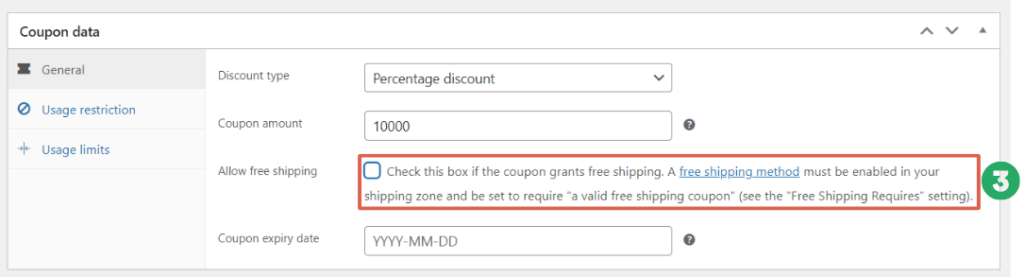
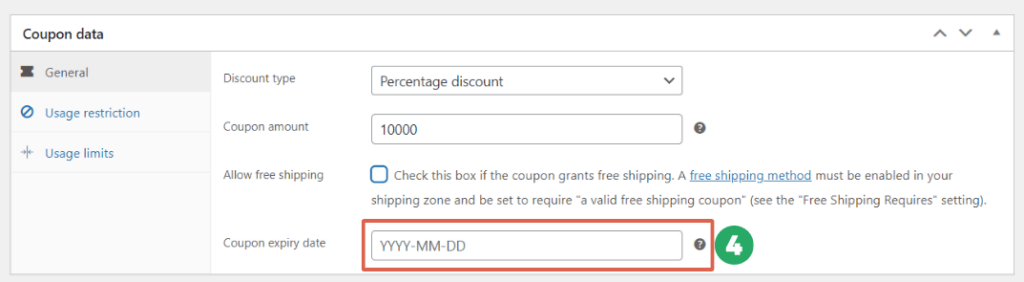
Once that’s done, scroll down to the Coupon data section. In the General tab, you’ll find options for Discount type, Coupon amount, Allow free shipping, and Coupon expiry date.
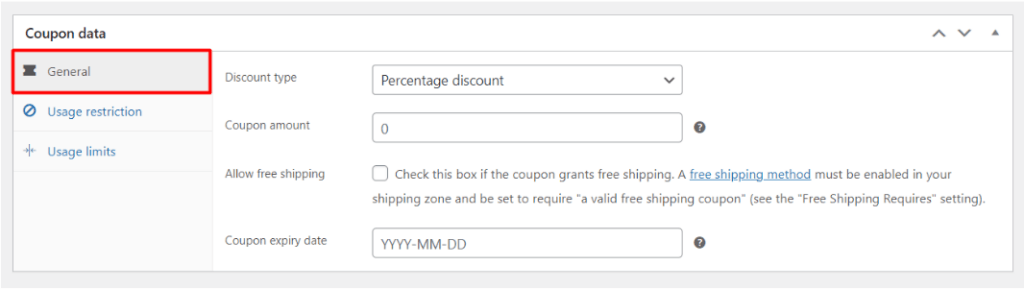
Here’s a breakdown of each option:
- Discount type: You have three choices here:
 – Percentage discount – Choose this to offer a percentage-based discount, like 10% off.
– Fixed cart discount – Choose this to apply a discount to the entire shopping cart total.
– Fixed product discount – Choose this to offer a discount on specific products only. For example, a special discount on Product X. - Coupon amount: This is the value of the discount, which corresponds to the Discount type you selected.

- Allow free shipping: Check this box if you want the coupon to grant free shipping. This option requires further setup.
- Coupon expiry date: Set the date when the coupon will expire and can no longer be used.

 – Percentage discount – Choose this to offer a percentage-based discount, like 10% off.
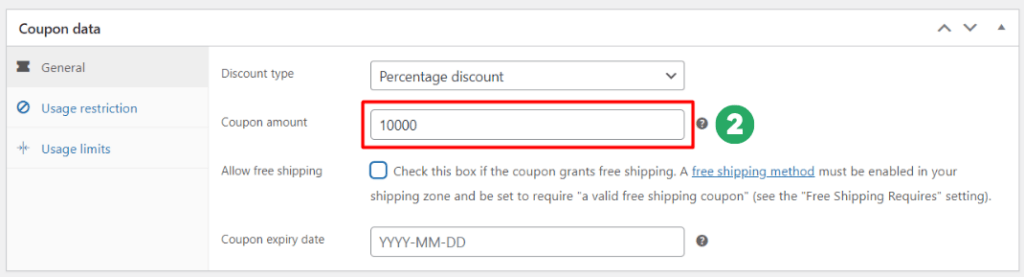
After configuring these initial settings, move on to the Usage restriction tab to define the conditions for using the coupon.
Step 2: Configure Usage Restrictions
Also Read:
Click on the Usage restriction menu located next to General. This section allows you to set the rules for when the discount can be applied, such as minimum spending, eligible products, and who can use the coupon.
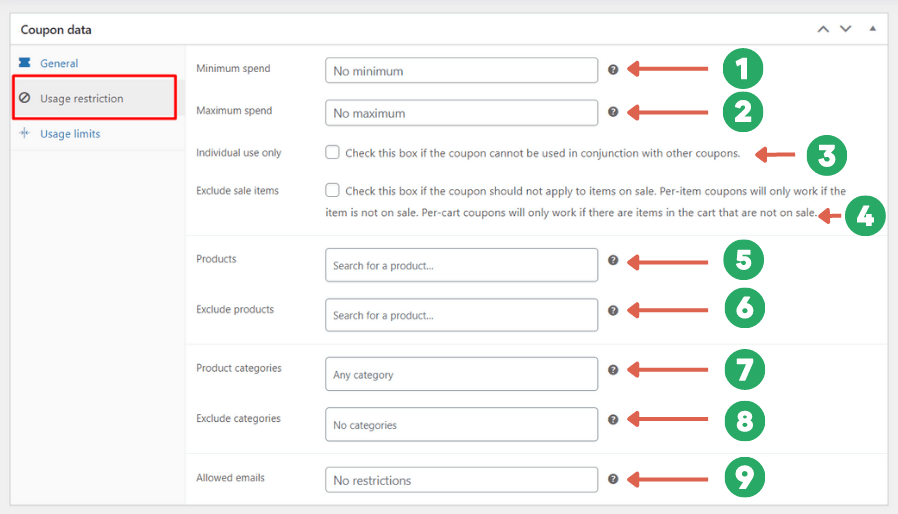
- Minimum spend – Enter the minimum purchase amount required for the coupon to be valid.
- Maximum spend – Enter the maximum purchase amount for which the coupon can be used.
- Individual use only – Check this box if the coupon cannot be used in conjunction with other coupons.
- Exclude sale items – Check this box to prevent the coupon from applying to items that are already on sale, avoiding a double discount.
- Products – In this field, you can select specific products that are eligible for this coupon. You must choose from products already published on your website. If you don’t have any yet, learn how to add products in WooCommerce.

- Exclude products – Here, you can specify products that are not eligible for the coupon discount.

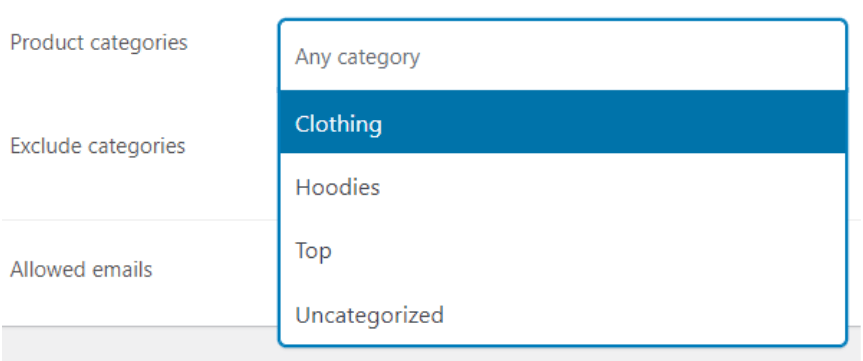
- Product categories – This allows you to apply the coupon to all products within specific categories.

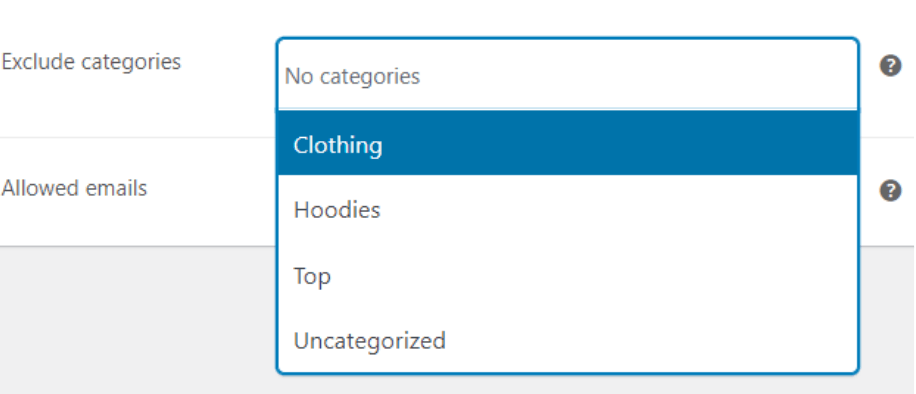
- Exclude categories – Conversely, this allows you to exclude specific product categories from the coupon’s validity.

- Allowed emails – You can restrict the coupon’s use to specific customer email addresses. If left blank, all customers can use the coupon.


Advertisements
Step 3: Set Usage Limits
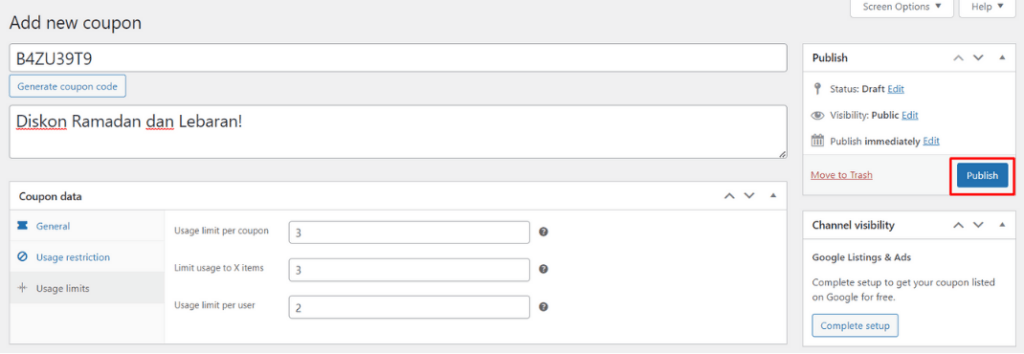
Usage limits in WooCommerce control how many times a discount coupon can be used. To configure these settings, click on the Usage limits tab.

- Usage limit per coupon – This sets a global limit on how many times a coupon can be used. For instance, if you set it to 100, the coupon will become invalid after its 100th use.
- Limit usage to X items – This restricts the discount to a certain number of items in the cart. For example, if the limit is 10, the coupon will only apply to up to 10 eligible products.
- Usage limit per user – This limits how many times an individual customer can use the coupon. For example, if you set it to 1, each customer can only use the coupon a single time.
Setting usage limits is crucial for controlling your promotions and preventing coupon abuse or unauthorized use by customers.
Advertisements
Step 4: Publish and Test Your Coupon
Once you have finished configuring all the settings for your discount coupon, click Publish to make it live. However, be sure to double-check that all the conditions meet your requirements first.
Before sharing the coupon code with your customers, it’s essential to test it to ensure it works correctly. You can do this by simulating a purchase. Add an eligible item to your cart and proceed to checkout.
Make sure the product you’ve selected meets the criteria you set for the coupon. Then, enter the code in the Coupon field and click Apply coupon.
If successful, you will see the discount applied to your total, reflecting the coupon settings you created. Congratulations, you’ve successfully created a discount coupon for your online store!

Advertisements
Have You Successfully Created Your WooCommerce Discount Coupon?
That’s our guide on how to properly create discount coupons in WooCommerce. By offering coupons, you can capture customer attention, boost sales, and build brand awareness.
In addition to product discounts, you can also create vouchers for shipping discounts through WooCommerce, which can further strengthen customer loyalty.
If you encounter any challenges while developing your e-commerce website, especially a WordPress-based one, feel free to contact our team at Tonjoo Studio via email at contact@tonjoo.com. We are happy to help you grow your business website.

For more articles on WordPress, WooCommerce, and web development, check out Tonjoo Studio Blog by Moch. Nasikhun Amin.
Last Updated on October 16, 2025 by Moch. Nasikhun Amin

Advertisements