Advertisements
For anyone diving into the world of programming, mastering Git and GitHub is essential. This platform is not just a place to store your code; it’s the industry-standard tool for collaboration and version control. Before you start using it, you need to understand its basic commands to ensure every change is properly documented.
This guide is specifically designed for beginners. You will learn how to use GitHub from start to finish, from installing and configuring Git, understanding key commands, to the practical steps of creating and managing your first repository.
Advertisements
What Is GitHub?
GitHub is a cloud-based hosting service for managing code using the Git version control system. The platform allows users to store, share, and collaborate on software development projects efficiently.
GitHub provides an easy-to-use user interface and integrates with various other development tools like CI/CD pipelines, issue trackers, and wikis.
Initial Setup
Before you can start using GitHub, there are a few initial steps you need to take:
Advertisements
1. Install Git
Download and install Git for your operating system from its official website.
2. Create a GitHub Account
Sign up for a free account on the GitHub website.
For a more detailed guide on installing Git and creating an account, you can read our article on how to create a GitHub account.
Advertisements
3. Configure Git on Your Computer
Open Command Prompt (CMD) and run the following two commands. Replace “Your Name” and “youremail@example.com” with the name and email you used for your GitHub account. This is crucial so that every change you make is attributed to you.
- git config –global user.name “Your Name”
- git config –global user.email “youremail@example.com”
Advertisements
Understanding Command Prompt (CMD) Commands
- cd: Changes the current directory.
- dir: Displays a list of files and directories in the current directory.
- mkdir: Creates a new directory.
- q: Quits or exits a program’s display.
- rmdir: Deletes a directory.
- del: Deletes one or more files.
- echo: Displays a message or sets the value of an environment variable.
- cls: Clears the screen.
- copy: Copies a file from one location to another.
- move: Moves or renames files and directories.
- exit: Exits CMD or closes the CMD window.
Advertisements
Summary of Basic Git Commands
There are many fundamental Git commands, but which ones are essential for beginners? Here are the basic commands you will use frequently:
- git clone <repository_url>: Downloads a repository from a remote source (e.g., GitHub) to your local machine.
- git status: Shows the status of file changes in the working directory.
- git init: Initializes a new directory as a Git repository.
- git add <file_name> or git add .: Adds files to the staging area.
- git commit -m “commit message”: Saves changes from the staging area to the local repository history.
- git push origin <branch_name>: Sends local commits to the remote repository on GitHub.
- git pull origin <branch_name>: Fetches and merges changes from the remote repository into the local working directory.
- git log: Views the commit history.
For a more comprehensive list of Git commands, you can refer to a Git cheat sheet.
How to Use GitHub for Beginners
In simple terms, using GitHub can be broken down into a few main steps. It starts with creating a GitHub repository and cloning it to your local computer, and goes all the way to viewing previous versions of your code files. Here are the steps:
Step 1: Create a New Repository
A repository (often shortened to “repo”) is where your project is stored. It can contain folders, files, images, videos, spreadsheets, and datasets—whatever your project needs.
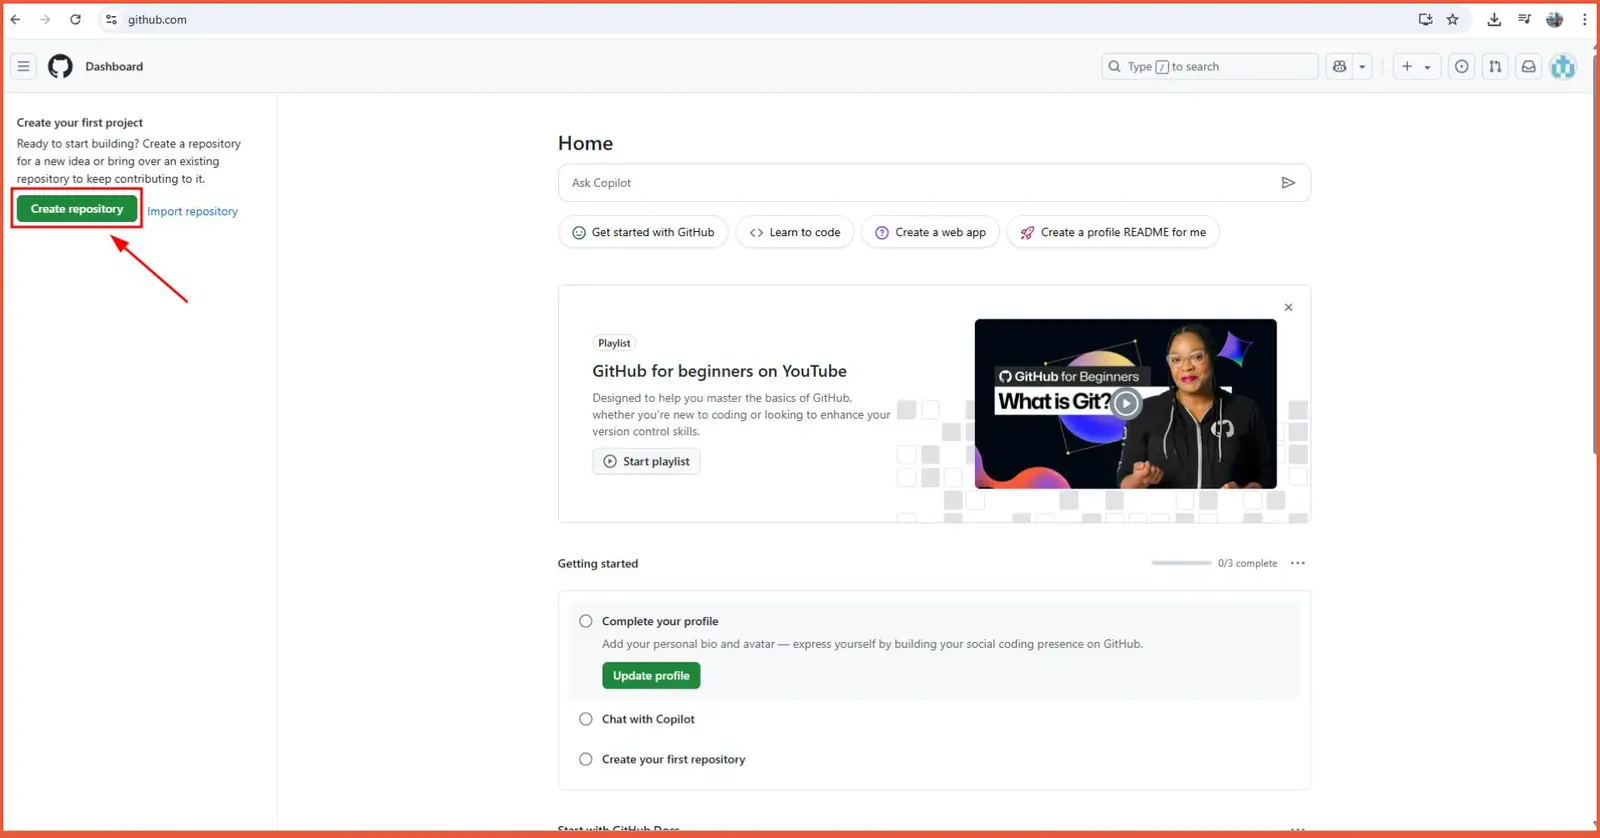
- After logging into GitHub, click the + button in the top-right corner, then select New repository.

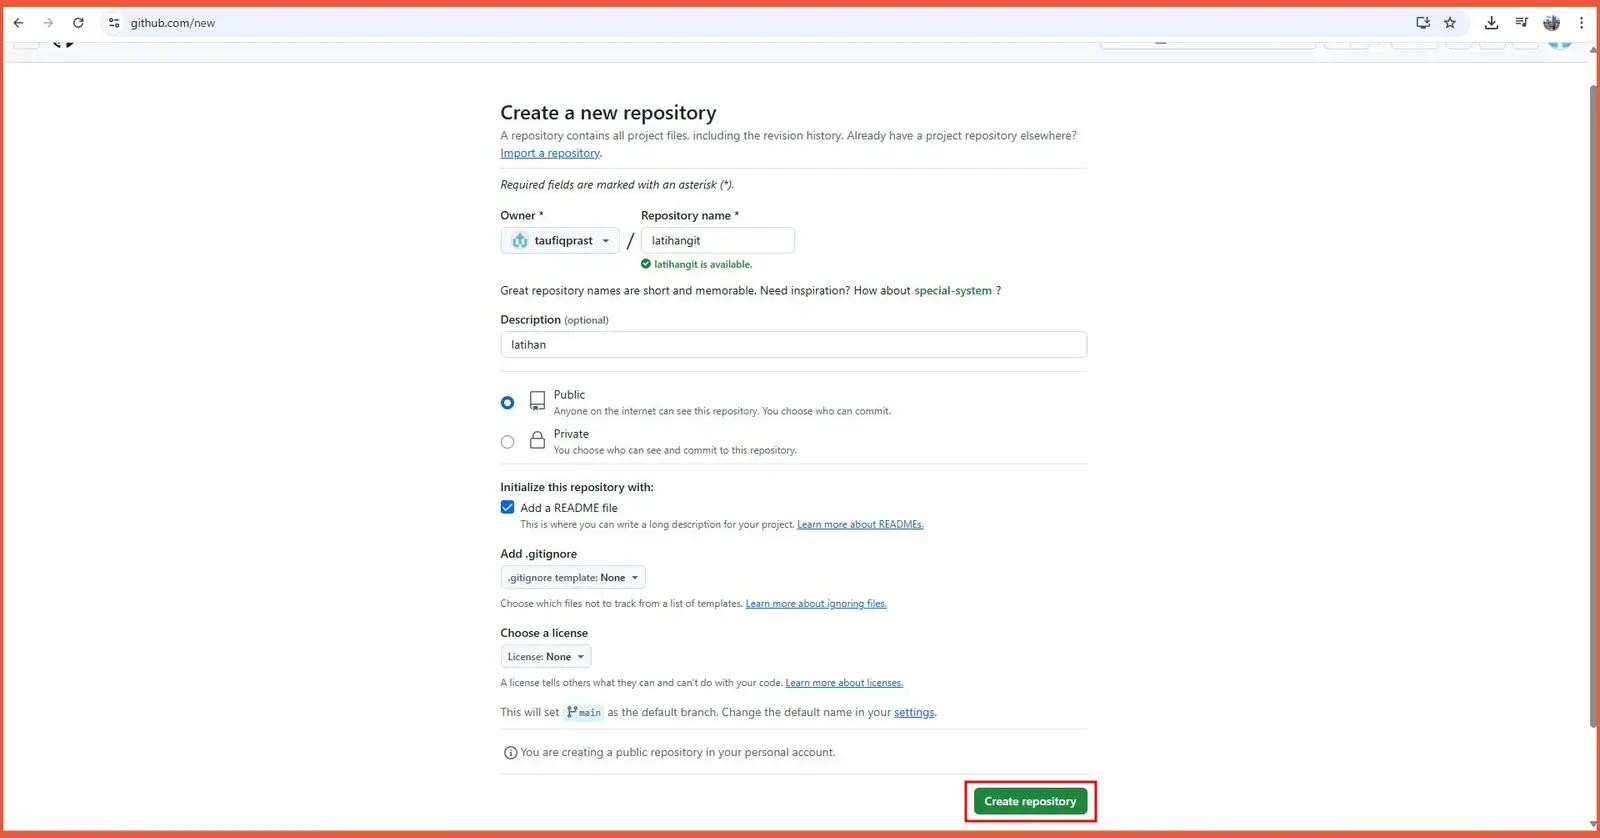
- Repository name: Give your repository a name (e.g., git-practice).
- Description (optional): Provide a brief description of your project.
- Public / Private:
- Public: Anyone on the internet can see this repository. You choose who can commit.
- Private: You choose who can see and commit to this repository.
- Initialize this repository with:
- Check “Add a README file”: This will create a README.md file, which typically contains a description of your project. This is a good practice.
- You can also choose to add a .gitignore file (which specifies files that Git should ignore) and a license. For beginners, a README file is sufficient.
- Click Create repository.
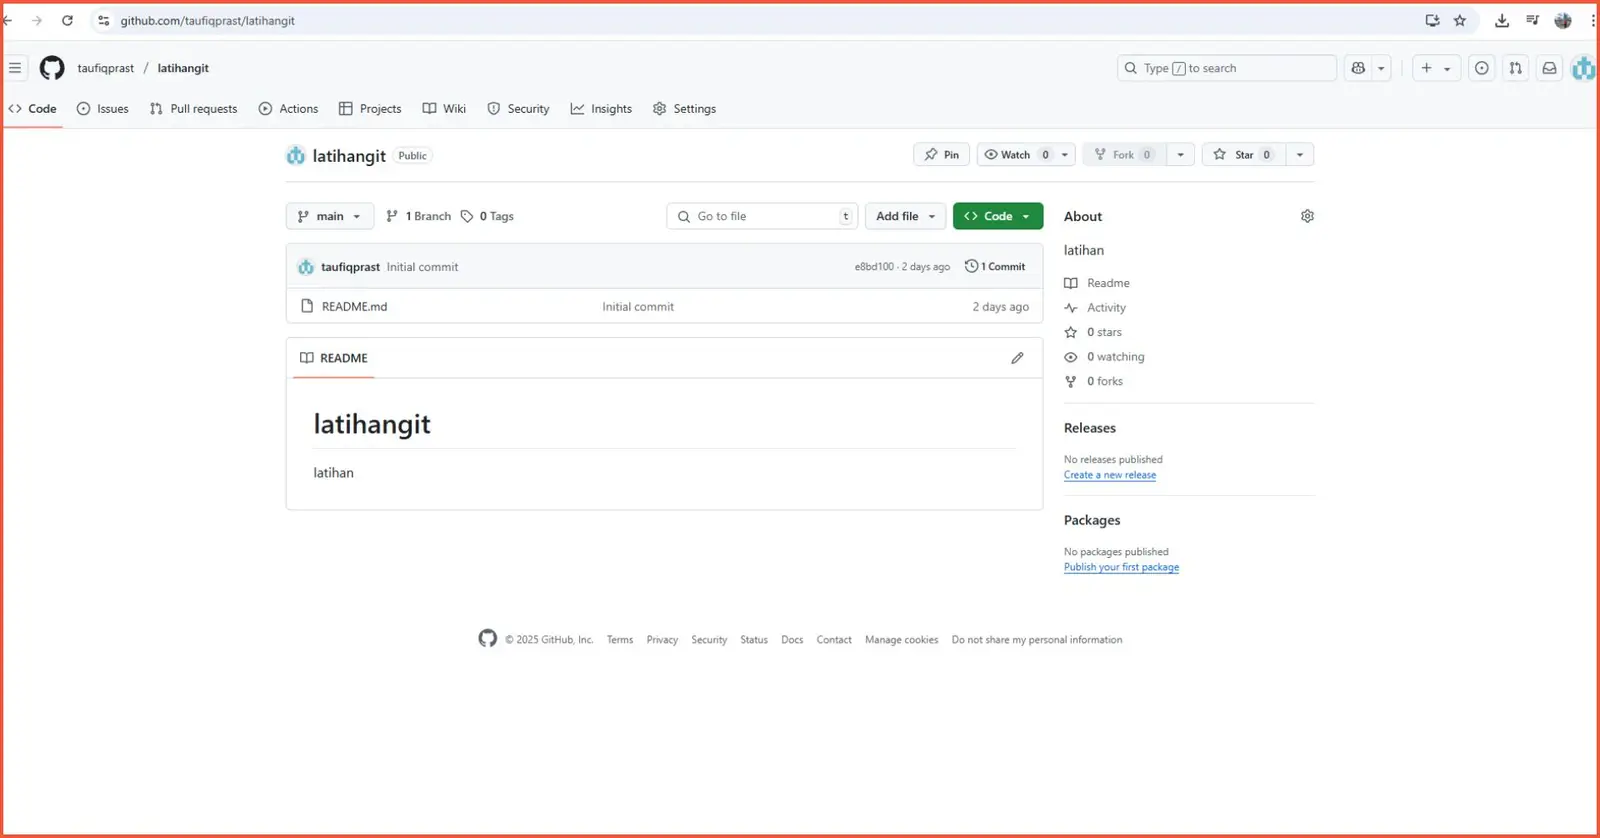
Here is what a newly created repository looks like:
Step 2: Clone the Repository to Local Storage
Now you have a repository on GitHub. To start working with it on your computer, you need to “clone” it. Here’s how to clone a repository from GitHub:
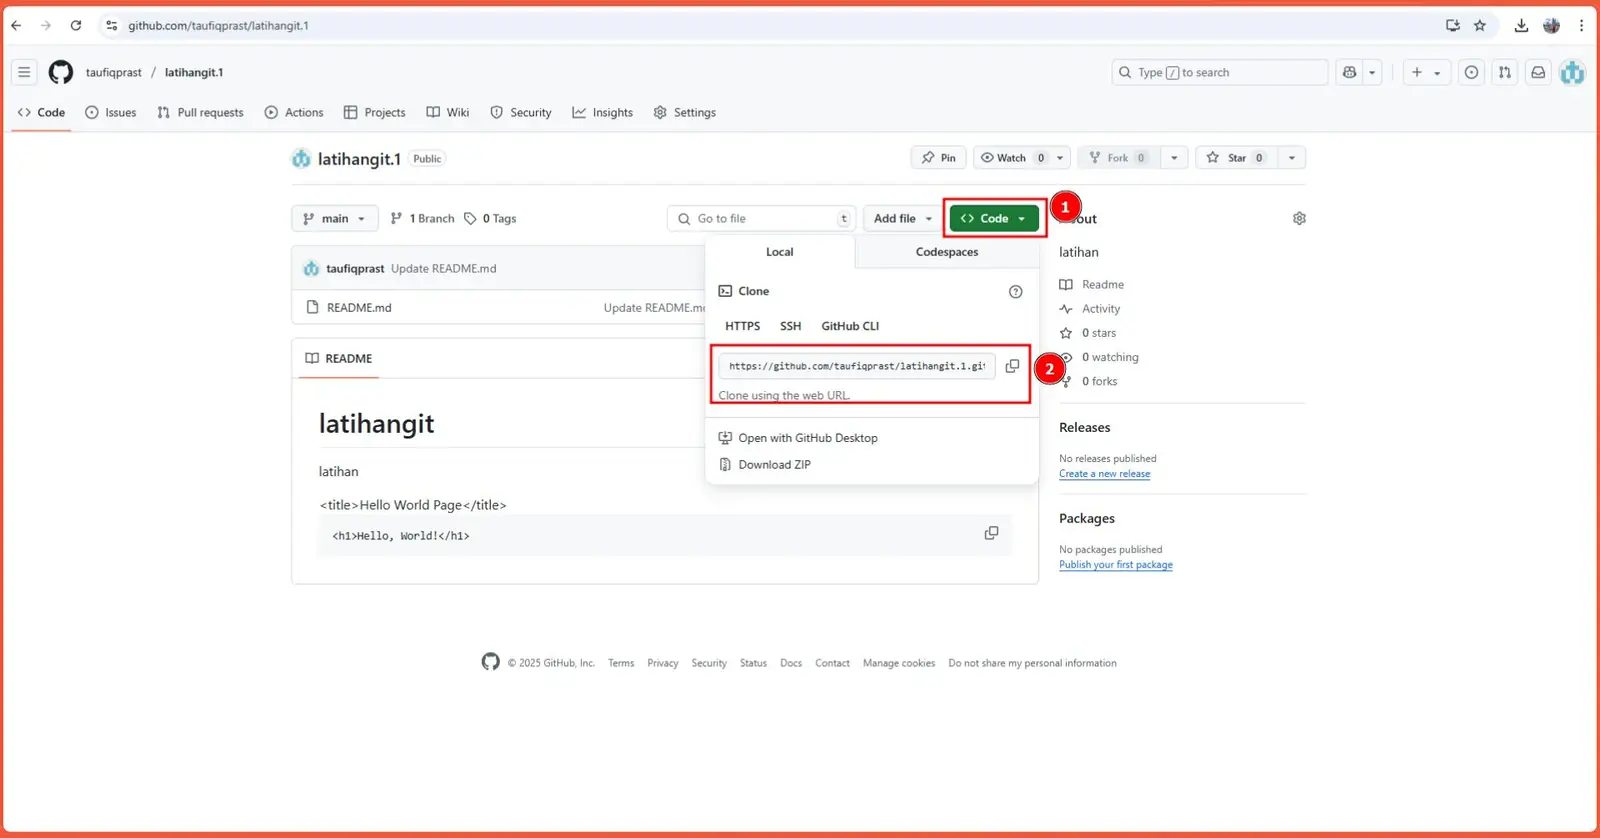
- On your GitHub repository page, click the green Code button.
- Copy the HTTPS URL (e.g., https://github.com/your-username/repository-name.git). In the example below, your-username is taufiqprast and the repository name is latihangit.1.git.
- Open a terminal or command prompt on your computer.
- Run the git clone command followed by the URL you copied:

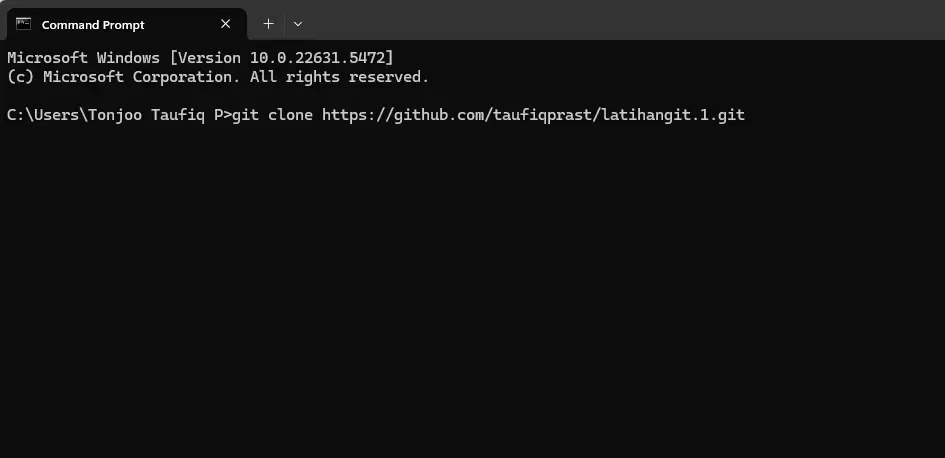
Replace taufiqprast with your GitHub username and latihangit.1.git with your repository’s name. This will create a new folder with your repository’s name on your local computer, containing all the files from your GitHub repository.
Step 3: Navigate to Your Local Git Repository
A local Git repository is like a “smart notebook” stored inside your project folder on your own computer. This notebook (which is actually a hidden folder named .git) not only stores the latest version of your files but also records the entire history of changes you’ve ever made. When you clone a repository, Git automatically sets up this local repository for you.
- Open a terminal or command prompt (CMD) to execute Git commands.
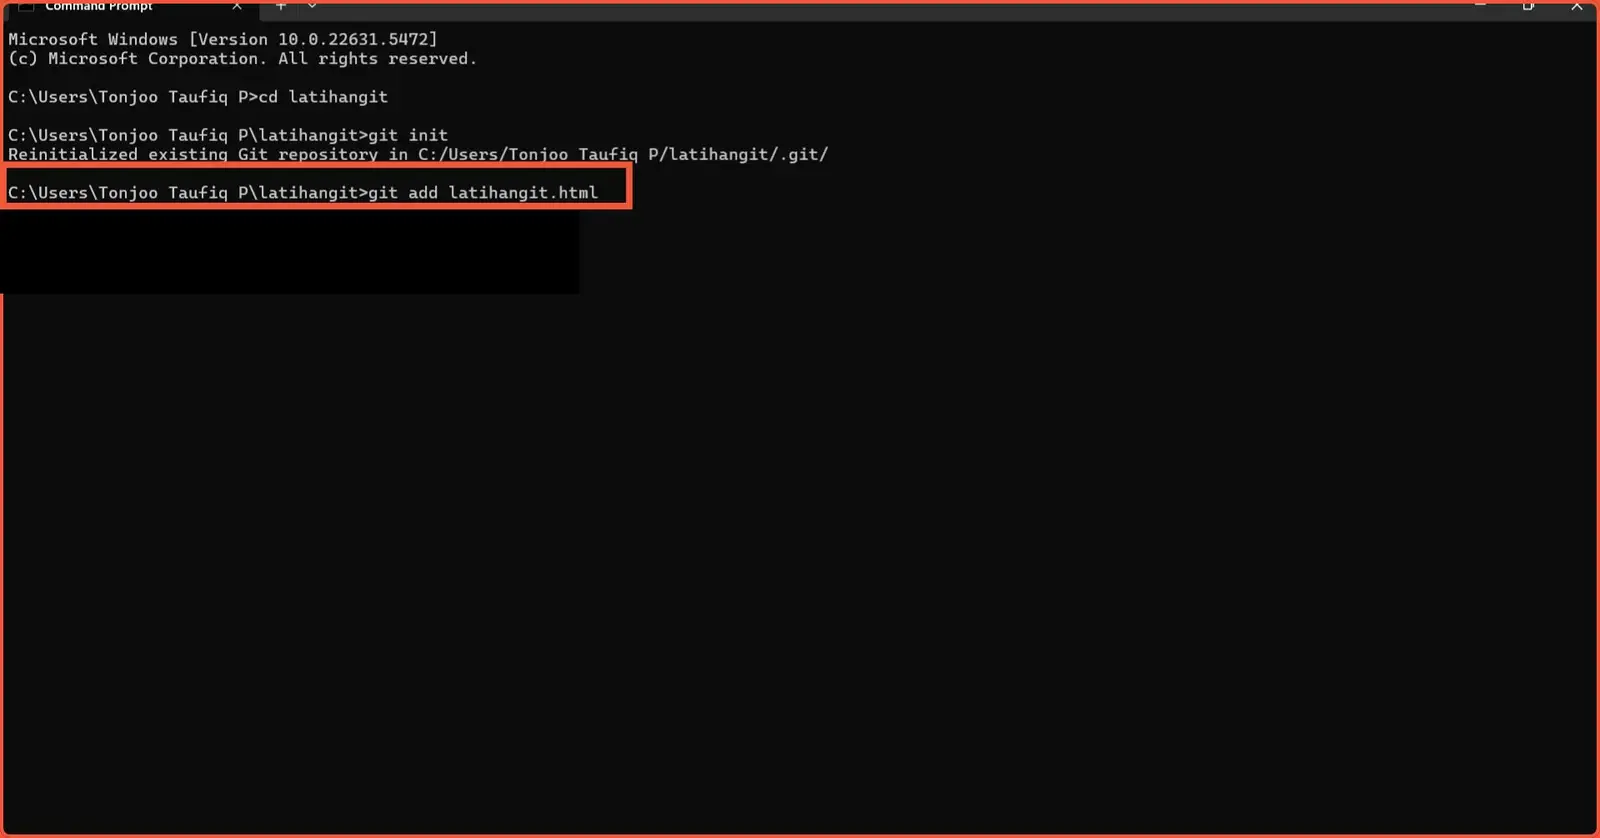
- Navigate into the repository folder you just cloned. For example, if the repository is named latihangit, you would use the cd command: cd latihangit

- Once you are in the correct directory, you can start tracking changes. The git clone command has already initialized the repository, so you do not need to run git init. You are now ready to work on your project files.


Step 4: Add Files to the Staging Area
The staging area is like a “waiting room” or a list of changes you have prepared to be included in your next commit.
Also Read:
There are three main ways to add files to the staging area: adding (1) all files, (2) a single file, or (3) specific multiple files. Here are the commands for each method:
- git add .: This command adds all modified and new files to the staging area.
- git add <file-name.html>: This command adds a single, specific file to the staging area. Example: git add practice-page.html.
- git add <file-name.html> <file-name-1.html>: This command is used to add several specific files to the staging area.
Since this tutorial involves changing code in a single file, we will use the git add <file-name> method. Here, the example command is git add latihangit.html.
To check if you’ve done this correctly, you can use the git status command. If you see one of the following messages, your git add process was successful:
- Changes to be committed: This indicates that there are changes that have been added to the staging area and are ready to be committed. The list of files under this section are the ones you successfully added with git add.
- Changes not staged for commit: This shows files that have been modified since the last commit but have not yet been added to the staging area. If you run git add and no longer see your file here, it means it has been successfully added to staging.
- Untracked files: This shows files that have never been tracked by Git. If you run git add for a file and it no longer appears in this section, it means it has been successfully staged.

Step 5: Edit Files
Once you have successfully added a file to the staging area using git add, you can now edit the file with a text editor. There are two ways to open the file for editing:
- Method 1: If you want to edit the file using Notepad, type notepad <file-name> in the CMD terminal.
- Method 2: If you want to edit the file using VS Code, type the command code <file-name> in the CMD terminal. Example: code latihangit.html.
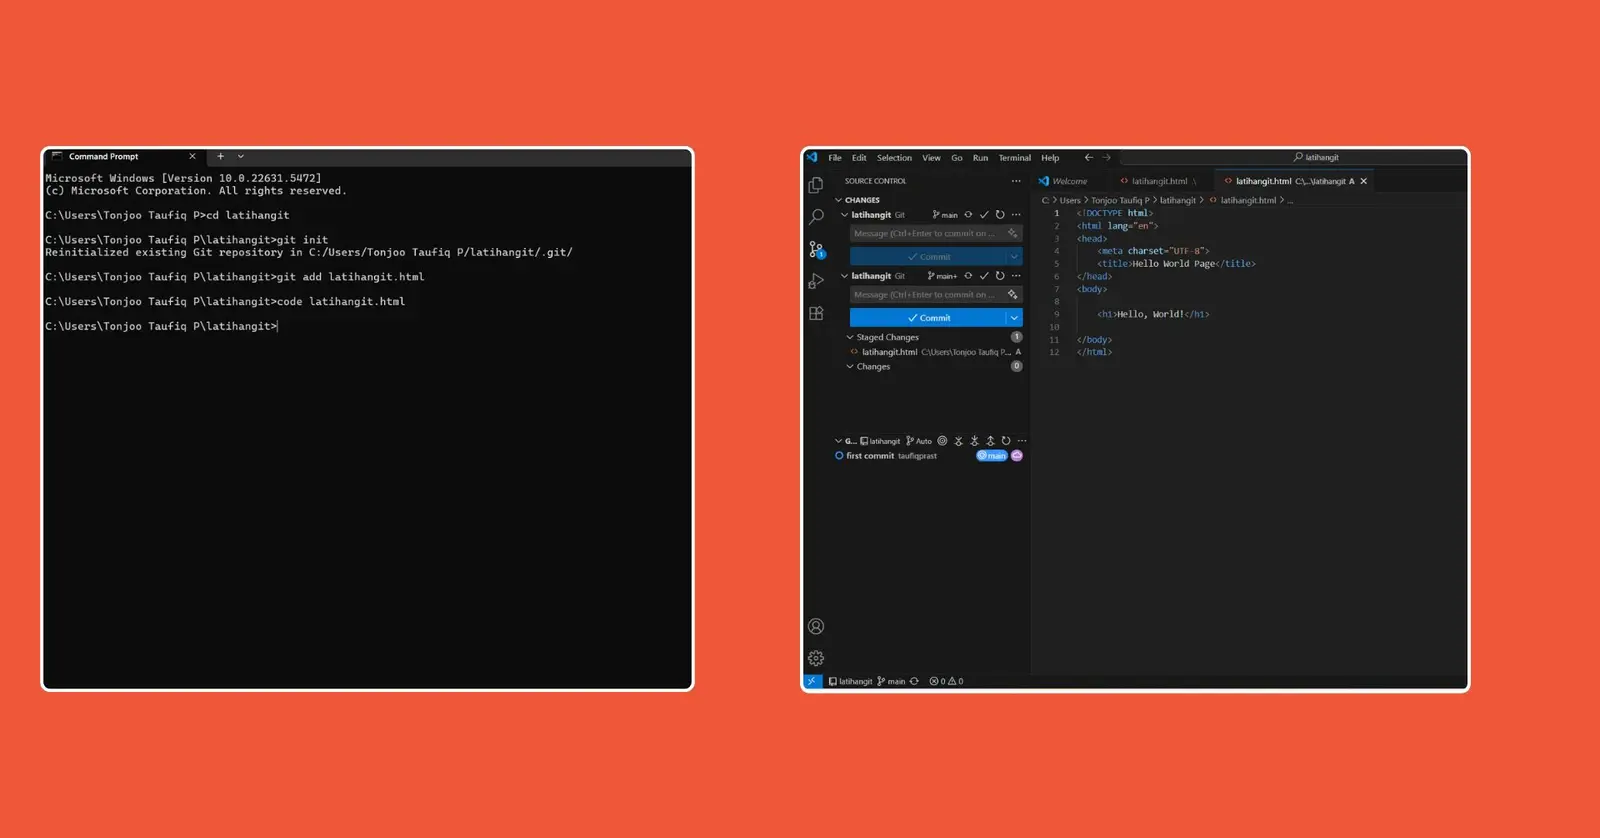
After editing the code in the file, save it. Then, you must run the git add command again. This is necessary because git add moves the latest changes from your working directory to the staging area.
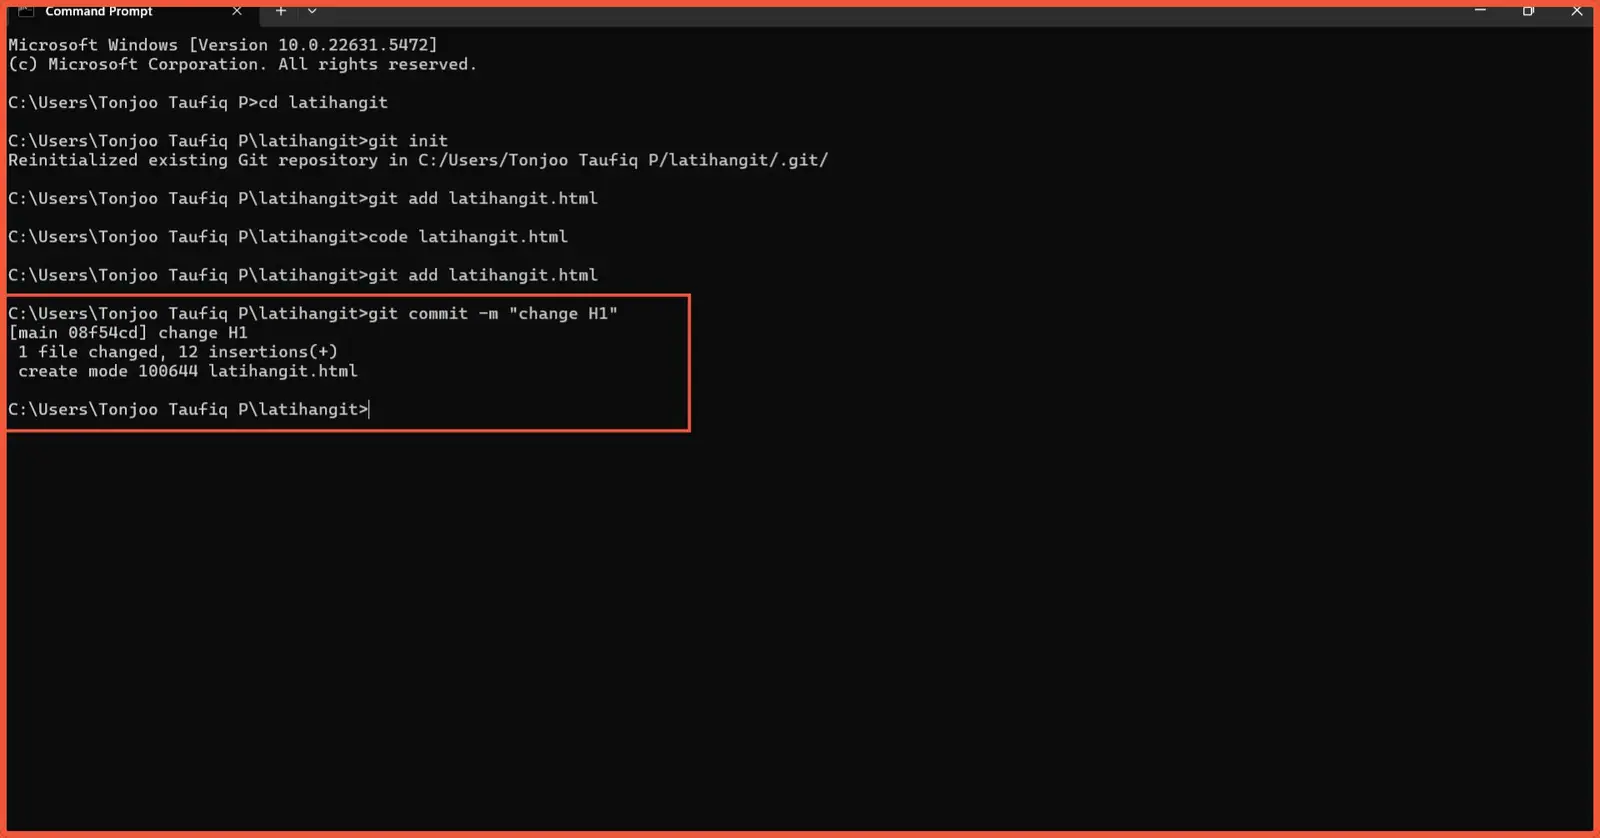
Step 6: Commit File Changes
After the previous steps are complete, issue the git commit command to commit your changes. In the context of Git, a commit is an action that saves the changes you’ve made to the Git repository.
When you perform a git commit, you must include a commit message. The message should explain what changes you made. Here are a few ways to write your message:
- Method 1, directly in the command line: You can add a commit message directly after the git commit command using the -m option. The format is git commit -m “your commit message”. Example: git commit -m “Change title”.
- Method 2, using the default text editor: If you just run the git commit command without the -m option, Git will open your default configured text editor for you to write the commit message.
- Method 3, using a GUI (Graphical User Interface): If you use a GUI tool for Git, like GitHub Desktop, GitKraken, or others, there will typically be a dedicated text box for writing your commit message.
Commit messages are important for providing context and understanding the history of changes in a repository, making it easy for other team members to understand the reason behind each change.
Step 7: View Commit History
Once the changes are saved, you can view the previous versions. Use the git log command to see a detailed history of your commits.
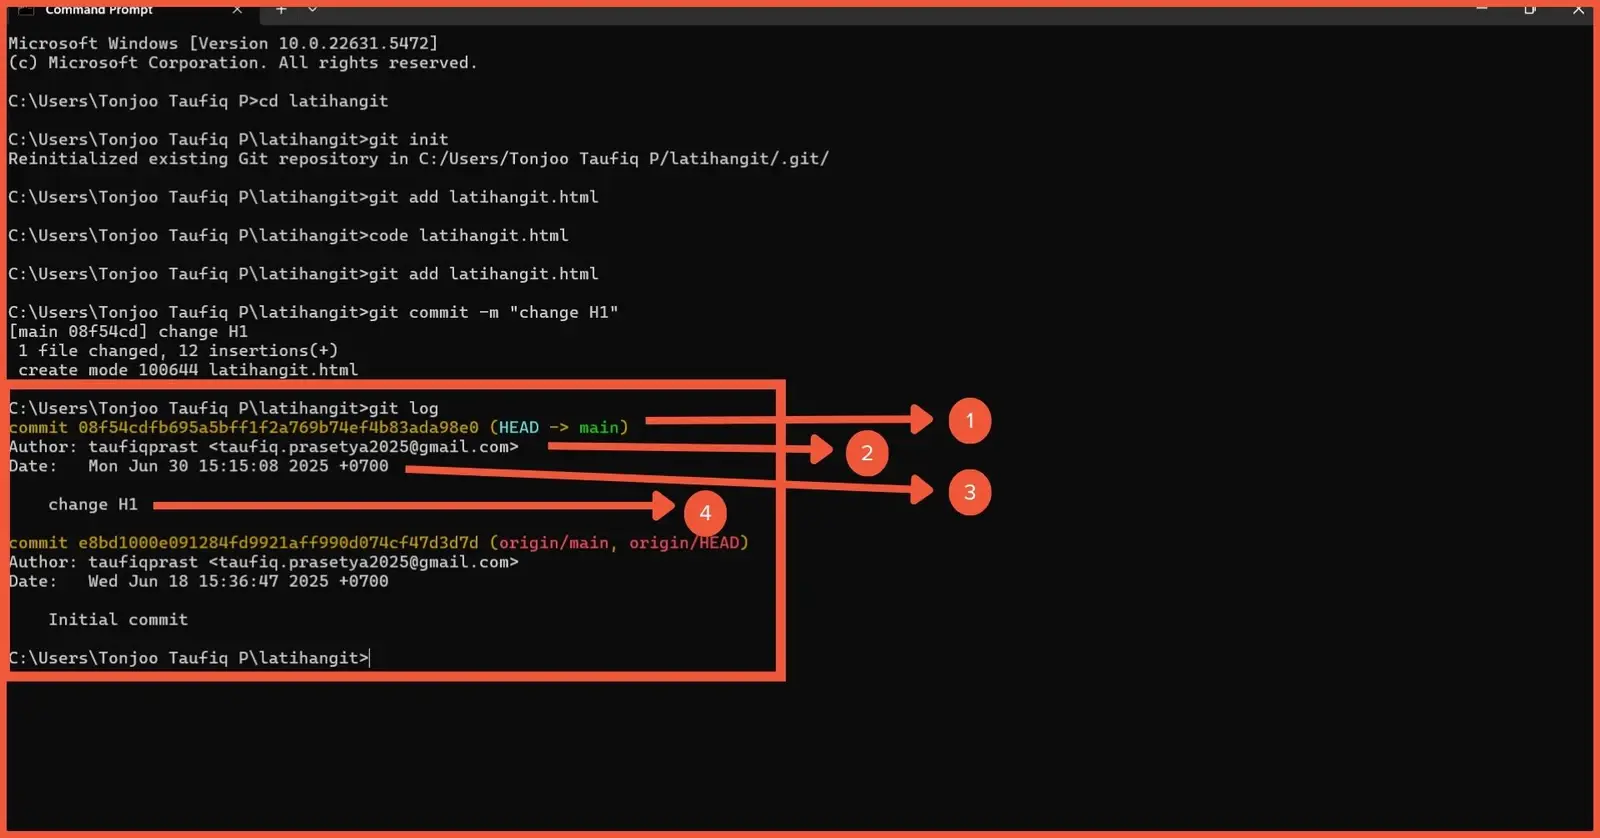
With the git log command above, all information about the changes will appear. If you look closely, the details available are as follows:
- Commit ID (SHA/hash): A unique code representing the commit.
- Author: The person who made the commit.
- Date and Time: When the commit was made.
- Commit Message: The description of the changes.
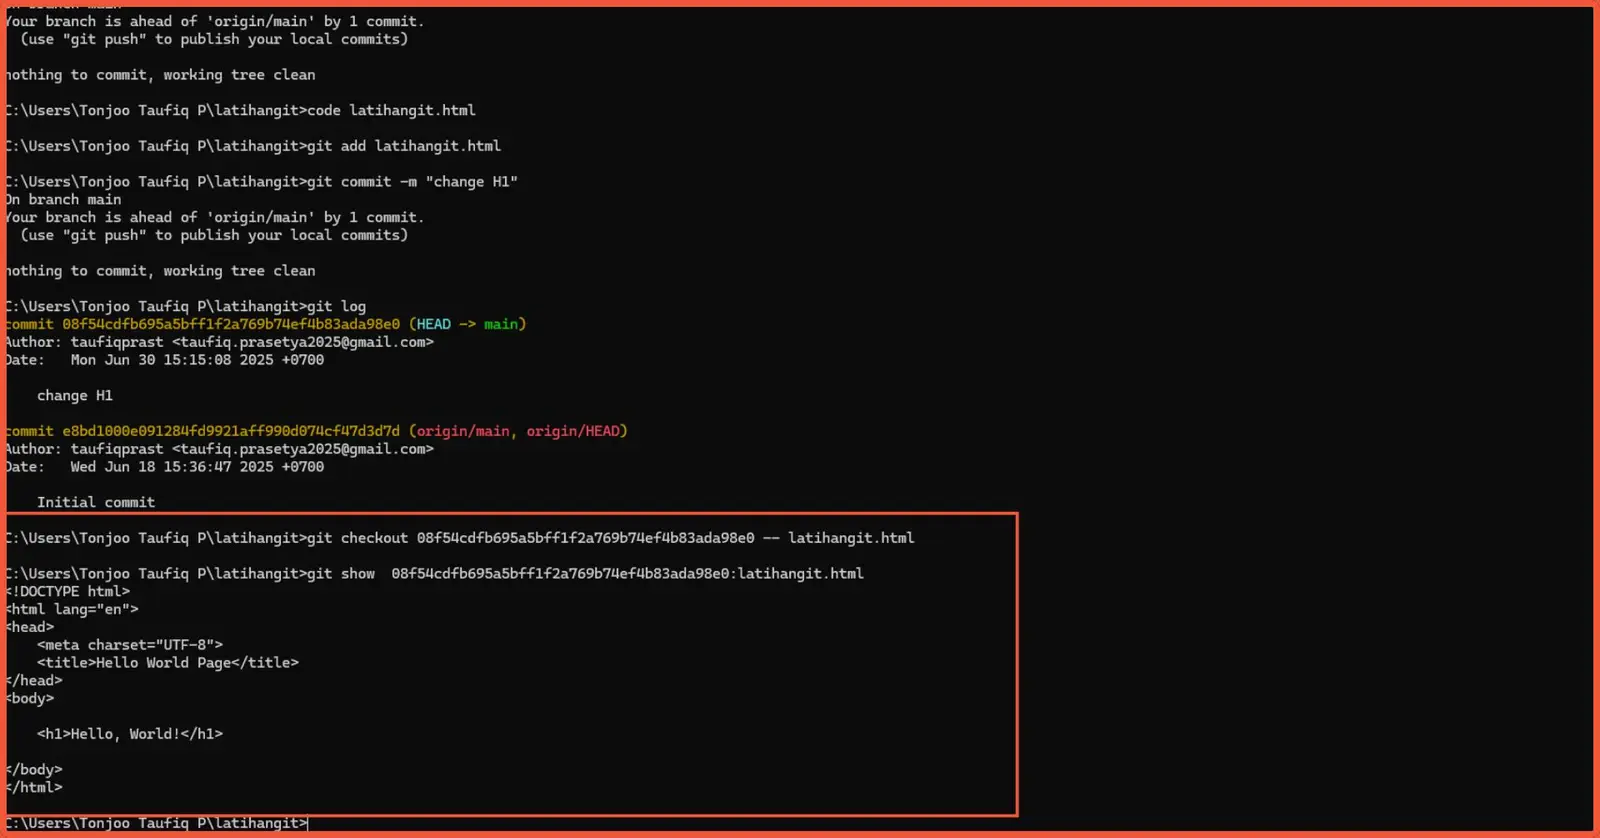
Step 8: View Previous File Versions
If you want to view or revert to a previous version of a file, use the git checkout command and add the commit_id you obtained earlier. There are two ways to use the git checkout command:
Method 1
Enter the command git checkout <commit_id> — <path/to/file>. For example: git checkout 08f54cdfb695a5bff1f2a769b74ef4b83ada98e0 — latihangit.html as shown below:
Method 2
You can also use the command git show <commit_id>:<path/to/file>, which is a command to display the file’s content from a specific commit directly in the terminal.
Are You Ready to Use GitHub?
That was a complete tutorial on how to use GitHub for beginners, along with its basic commands. Git allows you to work more efficiently in managing project resources, tracking changes, and collaborating with your team easily.
As website developers, Tonjoo also uses Git to develop client websites. This tool enables our team to work efficiently while maintaining high product quality.
The Tonjoo team has the expertise and experience to bring your business website to life. Hundreds of clients like Gadjah Mada University, Polygon Bikes, and many others have proven our capabilities.

For more articles on WordPress, WooCommerce, and web development, check out Tonjoo Studio Blog by Moch. Nasikhun Amin.
Last Updated on November 17, 2025 by Moch. Nasikhun Amin

Advertisements