
Advertisements
Properly configuring taxes in WordPress with WooCommerce is crucial, as it directly affects your profit margins and helps you meet your business’s necessary tax obligations.
For those who have just installed WooCommerce on WordPress to create an online store, you’ll need to configure several of the plugin’s features—tax setup being one of the most important.
This article covers how to enable the tax settings feature in WooCommerce, add tax rates, and even create exemptions for specific products.
So, how do you set up taxes in WooCommerce to ensure your online store runs smoothly and complies with tax requirements? Here’s the tutorial!
Advertisements
WooCommerce’s Tax Rate Features
Beyond features like adding product variations in WooCommerce, the tax rate management feature is a key advantage of the WooCommerce plugin for developing WordPress-based e-commerce websites.
Here are the main functions of the tax settings feature in WooCommerce:
- Enabling tax rates
- Defining tax rates
- Adding exemptions for specific products
- Choosing the calculation method
- Adding tax labels
By configuring your tax rates at the outset, you’ll simplify tax calculations down the line. Additionally, this tax feature includes its own reporting section, helping you to summarize tax costs separately from your product sales revenue.
How to Set Up Taxes in WooCommerce
Setting up taxes in WordPress with WooCommerce involves four main stages: (1.) enabling the tax feature, (2.) configuring settings, (3.) establishing rates, and (4.) viewing tax reports.
Advertisements
1. Step 1: Enabling the WooCommerce Tax Feature
The first step is to enable the tax feature itself. To do this, log into your WordPress wp-admin dashboard and follow these steps:
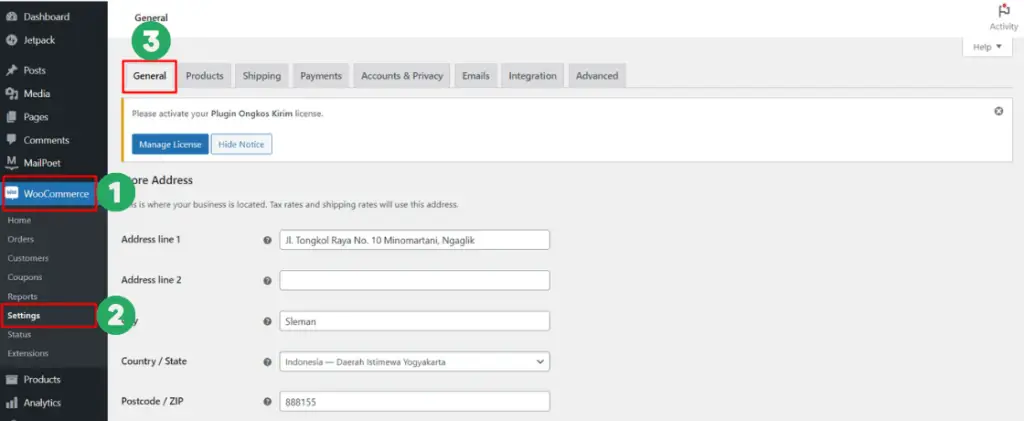
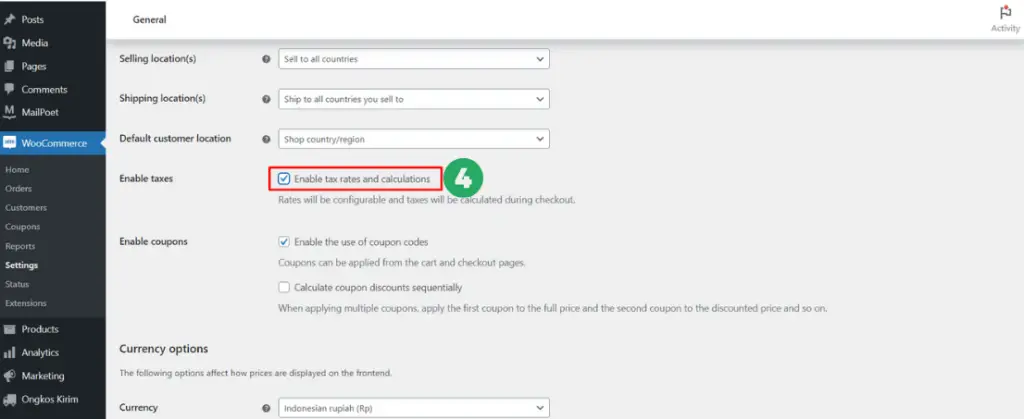
- In the left-hand menu, click WooCommerce > select Settings. You will automatically land on the General tab.

- Scroll down. In the Enable taxes section, check the box for Enable tax rates and calculations.

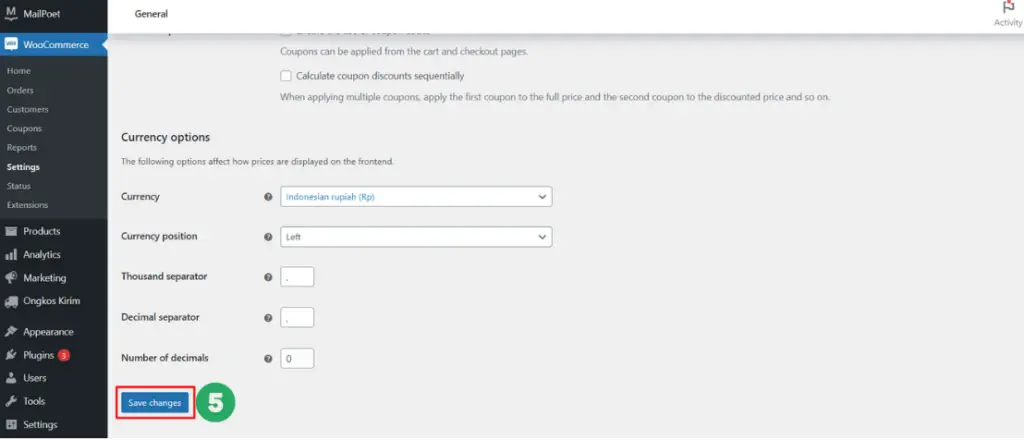
- Scroll to the very bottom and click the Save changes button.

- Once done, a new Tax tab will appear next to the General tab.
2. Step 2: Configuring WooCommerce Taxes
The next step is to configure your tax settings via the Tax tab. To get there from your wp-admin dashboard, click WooCommerce > Settings > click the Tax tab. This tab will only be visible if you have enabled it in the previous step.
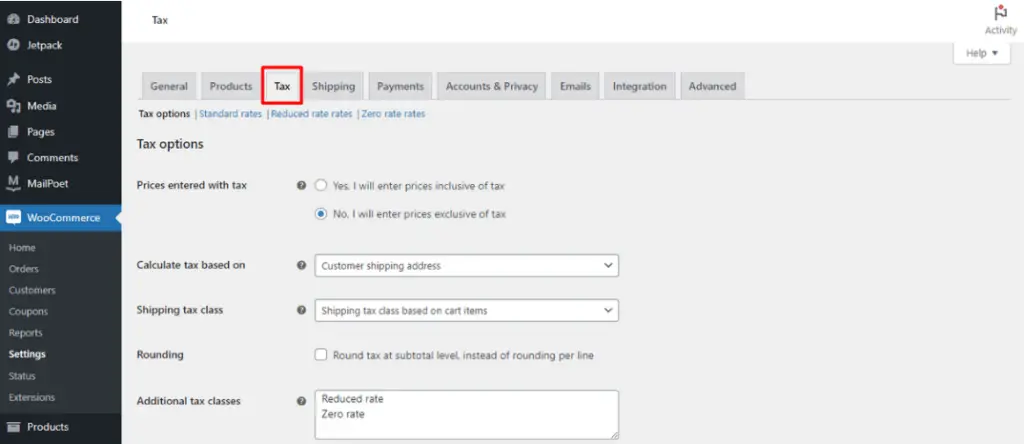
a. Prices entered with tax
The first option you’ll see is Prices entered with tax. This setting determines whether the prices you list for your products already include tax.

You have two options to choose from:
- “Yes, I will enter prices inclusive of tax” means the product prices you display already include tax.
- “No, I will enter prices exclusive of tax” means the product prices you display do not yet include tax.
This choice will also affect a later setting. If you choose Yes,… here, you should select an option that includes tax in point (f) below. If you choose No,…, you should select an option that excludes tax in point (f).
If these settings are inconsistent, customers might see a calculation error message, as the system will be confused about whether to add tax costs.
b. Calculate tax based on
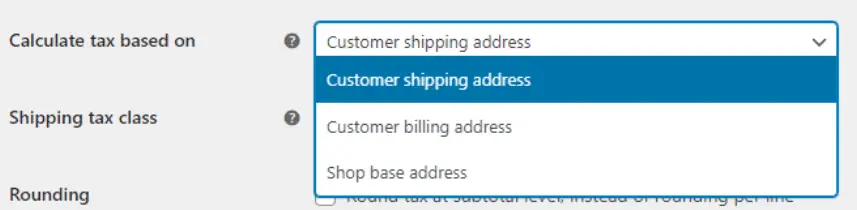
Next, the Calculate tax based on menu determines which address is used for tax calculations. There are three options:
- Customer shipping address – Tax is calculated based on the customer’s shipping address.
- Customer billing address – Tax is calculated based on the customer’s billing address.
- Shop base address – Tax is calculated based on your store’s physical address.
c. Shipping tax class
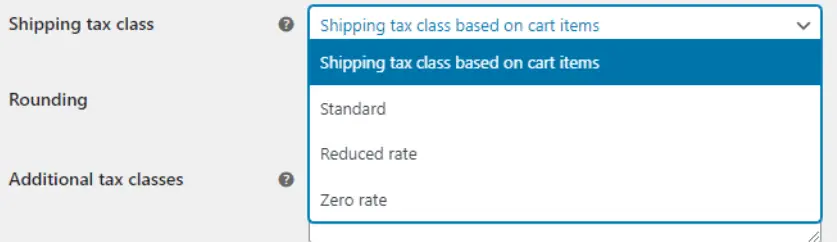
The Shipping tax class menu sets the tax rules for shipping. Here are the shipping tax options available:
- Shipping tax class based on cart items – Sets the shipping tax based on the individual items in the cart.
- Standard – Applies the standard tax rate to shipping.
- Reduced rate – Applies a reduced tax rate to shipping.
- Zero rate – Applies no tax to shipping.
In addition to configuring shipping tax, don’t forget to configure your shipping settings in WooCommerce, which specifically manage shipping costs.
d. Rounding
Rounding is a feature for rounding taxes. If you enable Round tax at subtotal level, instead of rounding per line, tax will be rounded based on the shopping subtotal, not on the tax for each individual product.

Example of enabling this feature:
A customer buys a shirt, shoes, and pants from your store. The tax applied is based on the subtotal of all items, not on each item purchased.
Also Read:
e. Additional tax classes
Additional tax classes is a feature for adding tax rules for specific cases, such as creating rules for reduced tax rates or tax-free situations.
By default, Reduced rate and Zero rate classes are available. You can change them to suit your needs.

The classes created in Additional tax classes will appear in two places: (1.) the Shipping tax class [in point c.] and (2.) in the settings at the very top, like this:

To make further adjustments, you can click directly on the link to go to that specific tax rate’s settings page.
f. Display prices in the shop, cart and checkout
This option determines how prices are displayed, whether they include tax during shopping, at checkout, or both. Selecting Excluding tax means the price does not yet include tax. Selecting Including tax means the price already includes tax.

g. Price display suffix
The Price display suffix feature allows you to add a note to the price, either before or after it, so customers can understand the price breakdown.

For example, if you add the note “Tax not included,” this note will appear next to the listed price. An example might look like “Rp. 58,000 (Tax not included).”
h. Display tax totals
The Display tax totals feature has two options:
- As a single total – Choose this option to show the tax as a single line item in the shopping total.
- Itemized – Choose this option to display the tax rate for each item/product that is taxable.

Once you have finished the configurations above, click Save changes to save your settings.
Advertisements
3. Step 3: Setting Up Tax Rates
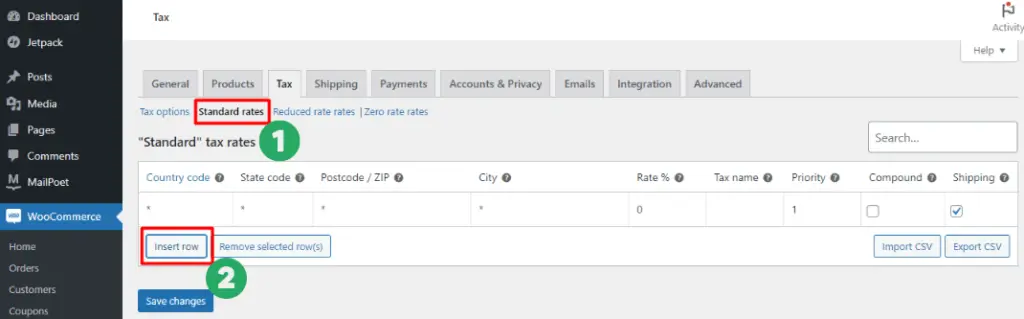
- Country code – A field for your 2-character country code. For example, Indonesia uses the code ID.
- State code – A field for the province/state code.
- Postcode / ZIP – A field for the postal code.
- City – A field for the city name.
- Rate % – To enter the tax rate (percentage).
- Tax name – To enter the type/name of the tax.
- Priority – To select the priority ranking of the tax rate in this row.
- Compound – To select whether this tax rate is a compound rate (applied on top of another tax).
- Shipping – To select whether this tax rate also applies to shipping.
Note:
- The Country code, State code, Postcode/ZIP, and City fields can be left blank if the tax rule you are setting applies to all areas.
- The Priority field determines how high/low the priority of the tax in this row is. For example, if it is priority 1, all items meeting these criteria will be subject to this priority 1 tax first.
To add another tax rate rule, you can click Insert row. You can add more rows if you need to create more than one tax rate rule. When you are finished, click Save changes.
Advertisements
4. Step 4: Viewing Tax Reports
Once you have configured your tax rates and transactions have started, you can view tax reports through WooCommerce’s Reports > Taxes feature. To do this, click WooCommerce > select the Reports menu > click the Taxes tab.
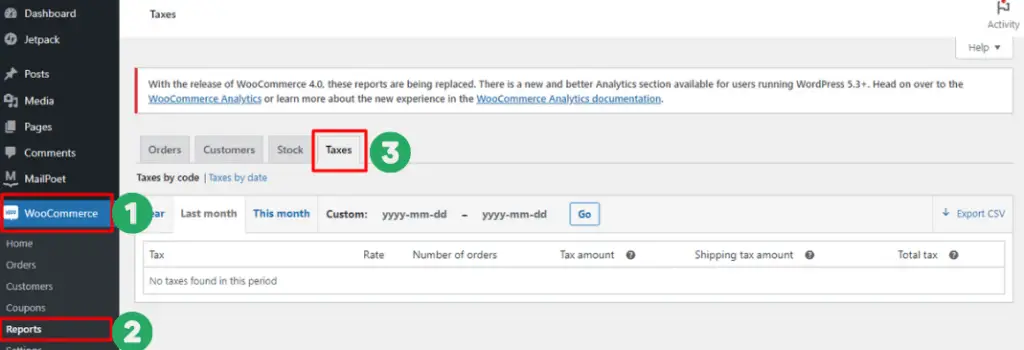
You can filter reports to view them annually, for the last month, this month, or a custom date range. You can also export the tax report data to a CSV format, which you can open in Microsoft Excel.
Advertisements
Have You Successfully Set Up Taxes in WooCommerce?
That’s how you set up taxes in WooCommerce to simplify tax calculations. Besides configuring taxes, WooCommerce also provides a reporting feature to view this data.
To make your online store’s pricing even more accurate, you should also practice setting up Shipping in WooCommerce to configure your product shipping rates.
However, WooCommerce’s native shipping system is still quite manual. Therefore, you may also want to add a Shipping Cost Plugin to display real-time shipping costs for your products.
If managing an e-commerce website on your own feels a bit overwhelming, you can use the services of a professional website developer in Indonesia, like Tonjoo Studio. Please feel free to contact us at contact@tonjoo.com for a free consultation.

For more articles on WordPress, WooCommerce, and web development, check out Tonjoo Studio Blog by Moch. Nasikhun Amin.
Last Updated on January 20, 2026 by Moch. Nasikhun Amin

Advertisements