How to Add Live Chat to WordPress Without Coding in 3 Steps

Advertisements
One of the most effective ways to boost your website’s performance is by adding a live chat feature in WordPress. But, how to add live chat to WordPress website? This guide is suitable for users of both the modern Gutenberg editor and the classic editor.
In this article, we’ll walk you through a demonstration of how to use a free plugin to display a live chat button on your website, no coding skills required.
So, why exactly should you add a live chat feature to your site? And what’s the right way to do it in WordPress? Let’s explore the details.
Advertisements
Why Do You Need Live Chat on Your WordPress Website?
A live chat feature on a website allows visitors to interact directly with the site’s administrators in real-time.
According to research published in the Wiley Online Library, implementing live chat on a website has a positive impact on conversions.
Here’s why you should consider using a live chat feature on your WordPress site:
1. Enhance Customer Engagement
Live chat enables customers to communicate in real-time with your support or sales team, leading to increased interaction and higher customer satisfaction.
Advertisements
2. Provide Rapid Responses
Customers value quick answers to their questions and swift solutions to their problems. Live chat is one of the most efficient ways to provide instant assistance.
3. Boost Conversions and Sales
By addressing customer doubts or questions in real-time, live chat can help increase conversions and drive sales. You can also monitor these conversions by installing Google Analytics in WordPress.
Advertisements
4. Gather Valuable Customer Data
Live chat can be an invaluable source of information about your customers’ needs, preferences, and feedback regarding your products or services.
Advertisements
How to Add Live Chat to WordPress
There are three main steps to adding live chat to WordPress using a plugin: (1) installing the plugin, (2) performing the initial setup, and (3) configuring the control panel.
Advertisements
Step 1: Install the Live Chat Plugin on Your WordPress Website
The first step is to install a plugin in WordPress, just as you normally would. For this tutorial, we will use the 3CX Free Live Chat plugin.
- Open your WP Admin dashboard.
- Click on the Plugins menu in the left sidebar, then select Add New.
- In the plugin search box, type “wp live chat“. Once the 3CX Free Live Chat plugin appears, click Install Now, and then click Activate.
- That’s it! The first step of installing the Live Chat plugin is complete.
If the installation was successful, you can proceed to the initial configuration.
Step 2: Initial Plugin Configuration
After installing the live chat plugin, the initial setup involves creating an account on the 3CX Live Chat site and activating the chat button on your website.
This method works whether you have installed WordPress on a local server or your site is already live. Here are the initial setup steps:
- Click on the 3CX Live Chat menu in your WP Admin sidebar, then click Sign up with Google. You can also choose to Sign up with email.
- Follow the steps to complete your 3CX Live Chat account registration.
- Copy the URL provided by 3CX Live Chat, as shown in item 1. You should also save the Login, Email, and Password information from item 2 in a secure place. You’ll need this information later to log into the 3CX Live Chat dashboard.
- Back in your WP Admin, paste the copied URL into the 3CX Talk URL field. Check the Enable in all pages box if you want the live chat button to appear on every page, or customize its placement by using the checkboxes below. Then, click Save Changes.
- The chat button for your customers will now be visible on the front-end of your website.
Also Read:
At this point, you have successfully added a live chat feature to your WordPress site. You can test the chat function by sending a message as a visitor and replying as an admin.
To reply to conversations, you will use the 3CX Live Chat control panel. You can also add more admin accounts to manage chats through the control panel configuration.
Step 3: Configuring the Control Panel
Once the live chat button appears on your WordPress site, you’ll need to configure the control panel, which is where all settings are managed.
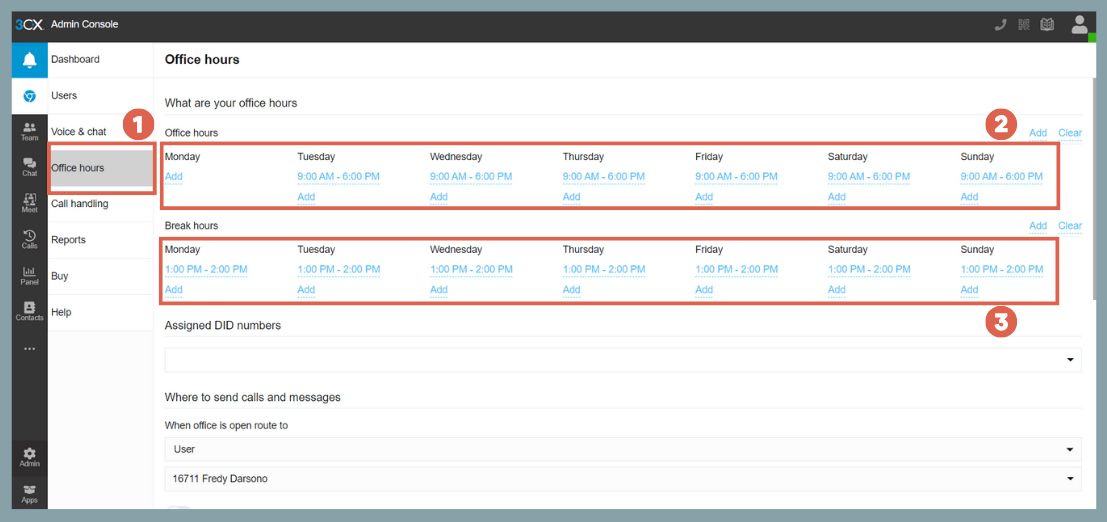
To get you started with the initial configuration in the 3CX control panel, we’ll demonstrate how to set up operating hours and add an admin:
- Log in to the 3CX control panel using the URL, email, and password you saved in Step 2.
- After logging in, you’ll see the main dashboard. Here, you can manage various settings, including adding admins and setting operating hours.
- To add an admin, click on Admin in the left sidebar, go to the Users menu, and click the + Add user button.
- Fill in the admin’s information and click Save.
- To set business hours, click on Office hours. You can then configure your Office hours (working hours) and Break hours.
- You can now explore and configure other settings in this control panel. For instance, to reply to visitor messages, simply go to the Chat menu in the sidebar.
That’s how you can add a live chat feature to WordPress using the free 3CX Live Chat plugin. Besides this tool, there are several other plugins you might want to try.
Recommended Live Chat Plugins for WordPress
In addition to 3CX Free Live Chat, here are a few other recommended Live Chat plugins you can explore:
1. HubSpot
Our first recommendation is the plugin from HubSpot, which helps businesses attract visitors, convert leads, and close customers. HubSpot offers a suite of tools for inbound marketing, including SEO, content marketing, email marketing, and, of course, live chat. The plugin has over 300,000 active installations on WordPress.
2. Tawk. To Live Chat
The Tawk.To plugin is a live chat application that lets you communicate with your website visitors in real-time.
Its goal is to make it easy for users to get the help or information they need while browsing a site.
Tawk.To offers features like real-time visitor monitoring, chat history, and chat widget personalization. The plugin boasts over 200,000 active installations.
3. Tidio
The Tidio plugin is a business communication solution that combines live chat, bots, and email marketing integrations. Tidio is easy to integrate with various website platforms like WordPress and Shopify, as well as other third-party applications. On WordPress alone, Tidio has been installed on over 100,000 websites.
Have You Successfully Added Live Chat to Your WordPress Site?
This tutorial has shown you how to add live chat to WordPress for free using the 3CX Live Chat plugin. We also provided several alternative plugins for you to consider.
You can also install the best WooCommerce plugins to make your online store more functional and advanced.
If you have any questions, encounter issues, or need a professional WordPress or WooCommerce developer, feel free to contact us through Tonjoo’s Contact page, and we’ll be happy to help!
For more articles on WordPress, WooCommerce, and web development, check out Tonjoo Studio Blog by Moch. Nasikhun Amin.
Last Updated on August 30, 2025 by Moch. Nasikhun Amin
Advertisements


